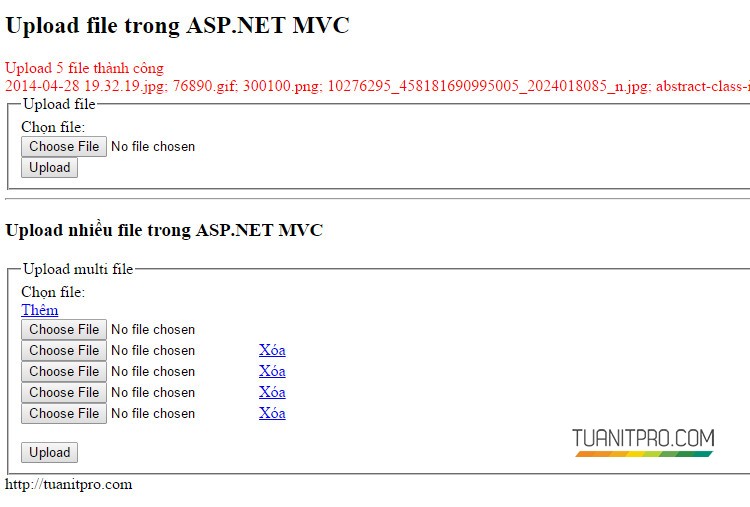
How to Upload file in Angular

Backend:

Link demo: http://angular.tuanitpro.com/#/uploader

  • Username: tuanitpro
  • Password: 123456


uploader.component.css

input[type='file']{
    display: none;
}
#uploader{
    width:100%; color:#fff; 
    font-family:Verdana, Geneva, Tahoma, sans-serif; 
     background:#0094ff;
      text-align:center;
       padding:50px;
        cursor:pointer;
}

uploader.component.html

<div class="container body">
  <div class="main_container">

    <div class="right_col" role="main">


      <div class="">
        <div class="clearfix"></div>
        <div class="row">
          <div class="col-md-12">
            <h2>Angular 4 - Upload file</h2>
          </div>

          <div class="col-md-12 col-sm-12 col-xs-12">
            <div class="x_panel" style="height: auto;">

              <div class="x_content">

                <input type="file" id="fileUploadInput" accept="images/*" (change)="fileChange($event)" />
                <div id="uploader"                    (click)="doUploadFile()">
                 <i class="fa fa-picture-o"></i> {{uploadResult.uploadingText}}
                </div>
                <div class="progress progress-striped" *ngIf="uploadResult.progress > 0">
                  <div class="progress-bar progress-bar-success"  [ngStyle]="{'width':  uploadResult.progress+'%'}">{{uploadResult.progress}}%</div>
                </div>
                <img  *ngIf="uploadResult.fileUrl" src="{{uploadResult.fileUrl}}" style="width:100%;" class="img-response">
              </div>
            </div>
          </div>
        </div>
      </div>


    </div>

  </div>
</div>

uploader.component.ts

import { Component, OnInit } from '@angular/core';
import { Title } from '@angular/platform-browser';
import { Http } from '@angular/http';

import $ from 'jquery/dist/jquery.min';

@Component({
  selector: 'app-uploader',
  templateUrl: './uploader.component.html',
  styleUrls: ['./uploader.component.css']
})
export class UploaderComponent implements OnInit {
  uploadingText = 'Chọn file (chỉ chấp nhận file ảnh)';
  uploadResult: any = {
    progress: 0,
    uploadingText: this.uploadingText,
    fileUrl: null
  }
  constructor(private title: Title) { }
  ngOnInit() {
    this.title.setTitle("Angular 4 - Upload file"); 
  }
  doUploadFile() {
    this.uploadResult.progress = 0;
    this.uploadResult.fileUrl = null;
    this.uploadResult.uploadingText = this.uploadingText;
    $("#fileUploadInput").trigger("click");
  }
  fileChange(event) {
    let fileList: FileList = event.target.files;
    if (fileList.length > 0) {
      let file: File = fileList[0];
      let formData: FormData = new FormData();
      formData.append('uploadFile', file);
      let xhr: XMLHttpRequest = new XMLHttpRequest();
      xhr.withCredentials = false;
      xhr.onreadystatechange = () => {
        if (xhr.readyState === 4) {
          if (xhr.status === 200) {
            let json = JSON.parse(xhr.response);
            let fileUrl = 'http://minhquandalat.com/uploads/' + json.Name;
            this.uploadResult.progress = 100;
            this.uploadResult.fileUrl = fileUrl;
            this.uploadResult.uploadingText = "Hoàn thành";

          } else {
            console.log(xhr.response);
          }
        }
      };
      xhr.upload.onprogress = (event) => {
        this.uploadResult.uploadingText = "Đang tải ảnh lên...";
        let percentVal = Math.round(event.loaded / event.total * 100);
        this.uploadResult.progress = percentVal;
      };
      xhr.open('POST', "http://minhquandalat.com/api/FileUpload", true);
      xhr.send(formData);
    }
  }
}

Happy coding

PHP Upload file

Upload file là một vấn đề quan trọng và cần thiết khi lập trình web. Chúng ta cần tải hình ảnh lên hosting, tải file ….
Đoạn code nhỏ trong php sau đây cho phép bạn làm thực hiện điều đó thật đơn giản.

PHP Upload file
PHP Upload file

Cấu hình file “php.ini”

Đầu tiên, để chắc chắn PHP cho phép upload file, chúng ta cần kiểm tra trong file php.ini. Trong file php.ini tìm đến dòng file_uploads gán = On

file_uploads = On

Thiết kế trang html

<!DOCTYPE html>
<html>
<body>
<h1>PHP - Upload file demo <a href="http://tuanitpro.com">http://tuanitpro.com</a></h1>
<form action="upload2.php" method="post" enctype="multipart/form-data">
    Chọn file upload:
    <input type="file" name="fileToUpload" id="fileToUpload">
    <input type="submit" value="Tải lên" name="submit">
</form>
<hr/>

</body>
</html>

Có vài quy tắc bạn cần nhớ.

  • Form phải để phương thức POST
  • Bắt buộc phải có thuộc tính
    enctype="multipart/form-data"
  • action của form chỉ đến trang upload2.php, là trang chứa code PHP thực hiện phía server.

Code trang upload2.php

<?php

if(isset($_POST["submit"])) {
$target_dir = "uploads/";
$target_file = $target_dir . basename($_FILES["fileToUpload"]["name"]);
$uploadOk = 1;
$imageFileType = pathinfo($target_file,PATHINFO_EXTENSION);
	// Kiểm tra file upload lên có phải là ảnh không?

    $check = getimagesize($_FILES["fileToUpload"]["tmp_name"]);
    if($check !== false) {
        echo "File có định dạng - " . $check["mime"] . ".";
        $uploadOk = 1;
    } else {
        echo "Chỉ cho phép hình ảnh.";
        $uploadOk = 0;
    }
 
// Kiểm tra file tồn tại hay chưa?
if (file_exists($target_file)) {
    echo "File đã tồn tại.";
    $uploadOk = 0;
}
// Kiểm tra kích thước file 500000 byte
if ($_FILES["fileToUpload"]["size"] > 500000) {
    echo "File quá lớn.";
    $uploadOk = 0;
}
// Kiểm tra định dạng ảnh hợp lệ không?
if($imageFileType != "jpg" && $imageFileType != "png" && $imageFileType != "jpeg"
&& $imageFileType != "gif" ) {
    echo "Chỉ cho phép các định dạng sau: JPG, JPEG, PNG & GIF";
    $uploadOk = 0;
}
// Kiểm tra điều kiện trước khi upload?
if ($uploadOk == 0) {
    echo "Upload thất bại.";
// Nếu ok thì cho phép upload file
} else {
    if (move_uploaded_file($_FILES["fileToUpload"]["tmp_name"], $target_file)) {
        echo " File ".$target_dir. basename( $_FILES["fileToUpload"]["name"]). " upload thành công.";
        echo '<br/><img src="'.$target_dir. basename( $_FILES["fileToUpload"]["name"]).'" width="160" />';
    } else {
        echo "Upload file thất bại, vui lòng thử lại.";
    }
}
}
?>

Một số giải thích:

  • $target_dir = “uploads/” – thư mục chứa file tải lên. Nằm cùng cấp với upload2.php
  • $target_file đường dẫn tập tin được tải lên
  • $uploadOk=1 để kiểm tra dữ liệu trước khi upload
  • $imageFileType kiểm tra phần mở rộng của tập tin
  • Tiếp theo kiểm tra xem ảnh có thật hay bị giả mạo (vd: social.php => social.png)

Chúc các bạn thành công.

Multiple file upload in ASP.NET MVC

Khi lập trình web với ASP.NET MVC hay bất kỳ ngôn ngữ nào khác như PHP chẳng hạn, chúng ta đều gặp những tình huống liên quan đến Upload file lên hosting, dễ thấy nhất là upload hình sản phẩm cho một sản phẩm nào đó.

Với ASP.NET MVC chúng ta dễ dàng làm được điều đó, bạn có thể upload 1 file hoặc upload nhiều file (Multiple file upload) trong ASP.NET MVC cùng lúc. Nó cực kỳ hữu ích trong nhiều trường hợp. Đoạn code nhỏ sau đây sẽ minh họa cho vấn đề này.

Multiple file upload in ASP.NET MVC

Code HTML

<!DOCTYPE html>
<html>
<head>
    <meta name="viewport" content="width=device-width" />
    <title>Upload file trong ASP.NET MVC</title>
    <script src="//code.jquery.com/jquery-1.11.0.min.js"></script>
    <script type="text/javascript">
        $(document).ready(function () {
            var max_fields = 10; //maximum input boxes allowed
            var wrapper = $(".myinput"); //Fields wrapper
            var add_button = $(".btnAddNew"); //Add button ID

            var x = 0; //initlal text box count
            $(add_button).click(function (e) { //on add input button click
                e.preventDefault();
                if (x < max_fields) { //max input box allowed
                    x++; //text box increment
                    $(wrapper).append('<div>   <input type="file" name="uploadFile['+x+']" /><a href="#" class="btnRemove">Xóa</a></div>'); //add input box
                }
            });

            $(wrapper).on("click", ".btnRemove", function (e) { //user click on remove text
                e.preventDefault(); $(this).parent('div').remove(); x--;
            })
        });
    </script>
</head>
<body>
    <div>
        <h2>Upload file trong ASP.NET MVC</h2>
        <div style="color:red">
            @Html.Raw(TempData["Msg"])
        </div>
        <fieldset>
            <legend>Upload file</legend>
            @using (Html.BeginForm("Upload", "Upload", FormMethod.Post, new { enctype = "multipart/form-data" }))
            {

                <label>Chọn file: </label>
                <br />
                <input type="file" name="uploadFile" required /><br />

                <input type="submit" value="Upload" />

            }
        </fieldset>
        <hr />
        <h3>Upload nhiều file trong ASP.NET MVC</h3>
        <fieldset>
            <legend>Upload multi file</legend>
            @using (Html.BeginForm("UploadMulti", "Upload", FormMethod.Post, new { enctype = "multipart/form-data" }))
            {

                <label>Chọn file: </label><br />
                <a class="btnAddNew" href="#">Thêm</a>
                <br />
                <div id="myinput" class="myinput">
                    <input type="file" name="uploadFile[0]" required /><br />
                </div>
                <br />
                <input type="submit" value="Upload" />

            }
        </fieldset>

Code cs

/**   FileName: UploadController.cs 
          Project Name: DateTime Ajax
          Date Created: 12/17/2014 11:30:58 PM 
          Description:  File Upload trong ASP.NET MVC
          Version: 0.0.0.0 
          Author: Lê Thanh Tuấn - Khoa CNTT
          Author Email: [email protected] 
          Author Mobile: 0976060432
          Author URI: https://tuanitpro.com 
          License: 
     */

    public class UploadController : Controller
    {
        // GET: Upload
        public ActionResult Index()
        {
            return View();
        }

        [HttpPost]
        public ActionResult Upload(HttpPostedFileBase uploadFile)
        {
            if (ModelState.IsValid)
            {
                string filePath = Path.Combine(HttpContext.Server.MapPath("/Uploads/demo"),
                                               Path.GetFileName(uploadFile.FileName));
                uploadFile.SaveAs(filePath);
                TempData["Msg"] = string.Format("Upload file {0} thành công", uploadFile.FileName);
            }
            return RedirectToAction("Index");
        }

        [HttpPost]
        public ActionResult UploadMulti(List<HttpPostedFileBase> uploadFile)
        {
            string abc = "";
            string def = "";
            foreach (var item in uploadFile)
            {

                string filePath = Path.Combine(HttpContext.Server.MapPath("/Uploads/demo"),
                                               Path.GetFileName(item.FileName));
                item.SaveAs(filePath);

                abc = string.Format("Upload {0} file thành công", uploadFile.Count);

                def += item.FileName + "; ";


            }
            TempData["Msg"] = abc + "</br>" + def;
            return RedirectToAction("Index");
        }
    }

Live demo

Chúc các bạn thành công.

Upload file trong ASP.NET

Khi lập trình web chúng ta hay gặp các tình huống cần phải upload một file nào đó lên hosting. Dễ thấy nhất là upload hình đại điện cho sản phẩm.

Đoạn code nhỏ cho phép bạn Upload file trong ASP.NET

Giao diện

Tạo trang HTML code

Code Upload trang .cs

Kết quả