Using Serilog + Seq with Minimal API in NET 7

Nhân dịp Microsoft tung ra con hàng .NET 7, nên mình update lại cái project cũ lên .NET 7, sẵn configure lại Serilog cho nó đẩy data ra seq cho dễ đọc.

Sample sử dụng NET 7 với minial api, cũng khá là hay ho.

Đầu tiên dựng sẵn cái server seq log bằng Docker

docker run --name seqlogger -d -p 5341:5341 -p 5342:80 -e ACCEPT_EULA=Y datalust/seq

Tiếp theo tạo một ứng dụng net core đơn giản

donet new web -o AntCommerce.Module.Order

OK đã xong, cái app đơn giản.

Add thêm đồ chơi liên quan Serilog vào app

dotnet add package Serilog.AspNetCore
dotnet add package Serilog.Enrichers.Environment
dotnet add package Serilog.Exceptions
dotnet add package Serilog.Extensions.Logging
dotnet add package Serilog.Sinks.Seq

Chúng ta có 2 cách để bắt sử dụng Serilog. Cấu hình bằng code và appSettings.json

Sử dụng code. Edit trong file Program.cs

builder.Host.UseSerilog();
Log.Logger = new LoggerConfiguration()
                .MinimumLevel.Information()
                .Enrich.FromLogContext()
                .Enrich.WithExceptionDetails()
                .Enrich.WithMachineName()
                .WriteTo.Console()
                .WriteTo.Seq("http://localhost:5341", Serilog.Events.LogEventLevel.Information)
                .CreateLogger();

Sử dụng appSettings.json. Edit trong file Program.cs

builder.Host.UseSerilog((context, loggerConfig) 
    => loggerConfig.ReadFrom.Configuration(context.Configuration));

Thêm vào file appsettings.json

  "Serilog": {
    "MinimumLevel": {
      "Default": "Debug",
      "Override": {
        "Microsoft": "Information",
        "System": "Information",
        "Microsoft.EntityFrameworkCore.Database.Command": "Information"
      }
    },
    "WriteTo": [
      {
        "Name": "Console"
      },
      {
        "Name": "Seq",
        "Application": "Order API",
        "Args": { "serverUrl": "http://localhost:5341" }
        }
    ],
    "Enrich": [  
      "FromLogContext",
      "WithMachineName",
      "WithProcessId",
      "WithThreadId",
      "WithMachineEnvironmentName",
      "WithExceptionDetails"
    ],
    "Properties": {
      "Application": "Order API"
    }
  }

Bắt đầu sử dụng

Tận hưởng thành quả

Chúc các bạn vui vẻ, happy coding.

Source code: https://github.com/tuanitpro/AntCommerce

[.NET] Sử dụng Papercut-SMTP để test email trong khi develop

Trong quá trình phát triển phần mềm sẽ có rất nhiều tasks liên quan đến việc bạn phải gửi một email ra ngoài. Ví dụ: đang ký tài khoản cần gửi email để kích hoạt, hay khách hàng đặt hàng trên website của bạn.

Bạn có thể test thử quá trình này bằng cách gửi vào email của bạn, hoặc email được thiết lập trước… Tuy nhiên trong quá trình develop, rất có thể gửi nhầm vào email khách hàng, hoặc tốn thời gian setup mail server để test.

https://github.com/ChangemakerStudios/Papercut-SMTP

Papercut-SMTP tool cho phép bạn giả lập email server ngay tại máy của mình, để test xem có nhận được email hay chưa, email có đúng nội dung hay không.

Cách sử dụng khá đơn giản. Chỉ cần cấu hình trong app.config hoặc web.config

Khi bạn sử dụng SMTP trong .NET để gửi email, Papercut-SMTP sẽ đọc được nội dung đó để kiểm tra.

Chúc các bạn thành công.

C# Làm sao thoát khỏi if / switch case quá nhiều?

Câu lệnh điều kiện if hay switch case là thường gặp trong lập trinh. Tuy nhiên khi mà if quá nhiều trong một block code, hay switch case quá nhiều thì nó sẽ gây phức tạp và dễ xảy ra bug. Cũng như khó khăn khi viết Unit Tests. Clean code khuyên rằng không nên dùng quá 4 câu lệnh if trong 1 block code.
Vậy đâu là giải pháp để tránh vấn đề này. Trong .NET có hỗ trợ một kiểu dữ liệu đó là Dictionary. Bạn sẽ gặp đâu đó nói rằng Dictionary còn phức tạp hơn, khó tiếp cận hơn if condition nữa. Điều đó là đúng, tuy nhiên qua các ví dụ dưới đây sẽ giúp bạn thấy dễ dàng làm chủ Dictionary hơn, và tránh phải if else, hay switch case quá nhiều.

Vậy Dictionary là gì?

Dictionary is a data structure for storing a group of objects. Objects are stored as key/value pairs collection which is useful and generic in different object oriented programming languages.

Dictionary can be used for mappings, in-memory cache, tables etc.

Dictionary’s key and value are generic types. In this way delegates can be set as key or value.

Hiểu đơn giản, Dictionary trong C# là một Collections lưu trữ dữ liệu dưới dạng cặp Key – Value. Key đại diện cho 1 khoá giống như chỉ số phần tử của mảng và Value chính là giá trị tương ứng của khoá đó. Ta sẽ dử dụng Key để truy cập đến Value tương ứng.

Chúng ta có bài toán cho phép ứng dụng có thể kết nối đến nhiều loại data source khác nhau. MySql, SqlServer, MongoDb, Redis, Xml…

ConnectionDataHelper.cs

public class ConnectionDataHelper
    {
        public static void ConnectToMySql()
        {
            Console.WriteLine("Connect to MySql");
        }

        public static void ConnectToSqlServer()
        {
            Console.WriteLine("Connect to Sql Server");
        }

        public static void ConnectToMongoDb()
        {
            Console.WriteLine("Connect to MongdoDb");
        }

        public static void ConnectToRedis()
        {
            Console.WriteLine("Connect to Redis");
        }

        public static void ConnectToXml()
        {
            Console.WriteLine("Connect to Xml");
        }
    }

Ví dụ dùng if else.

    
internal class Program
    {
        private static void Main(string[] args)
        {
            DataSource dataSource = DataSource.MySql;
            Console.WriteLine("Connection to DB Source: " + dataSource.ToString());
            if (dataSource == DataSource.MySql)
            {
                ConnectionDataHelper.ConnectToMySql();
            }
            else if (dataSource == DataSource.SqlServer)
            {
                ConnectionDataHelper.ConnectToSqlServer();
            }
            else if (dataSource == DataSource.MongoDb)
            {
                ConnectionDataHelper.ConnectToMongoDb();
            }
            else if (dataSource == DataSource.Redis)
            {
                ConnectionDataHelper.ConnectToRedis();
            }
            else if (dataSource == DataSource.Xml)
            {
                ConnectionDataHelper.ConnectToXml();
            }

            Console.ReadKey();
        }

        private enum DataSource
        {
            MySql,
            SqlServer,
            MongoDb,
            Redis,
            Xml
        }
    }

Cách viết switch case dễ đọc hơn một chút, nhưng vẫn còn dài

internal class Program
    {
        private static void Main(string[] args)
        {
            DataSource dataSource = DataSource.MySql;
            Console.WriteLine("Connection to DB Source: " + dataSource.ToString());
            switch (dataSource)
            {
                case DataSource.MySql:
                    ConnectionDataHelper.ConnectToMySql();
                    break;

                case DataSource.SqlServer:
                    ConnectionDataHelper.ConnectToSqlServer();
                    break;

                case DataSource.MongoDb:
                    ConnectionDataHelper.ConnectToMongoDb();
                    break;

                case DataSource.Redis:
                    ConnectionDataHelper.ConnectToRedis();
                    break;

                case DataSource.Xml:
                    ConnectionDataHelper.ConnectToXml();
                    break;
            }

            Console.ReadKey();
        }

        private enum DataSource
        {
            MySql,
            SqlServer,
            MongoDb,
            Redis,
            Xml
        }
    }

Bây giờ chúng ta thử chuyển sang sử dụng Dictionary.

internal class Program
    {
        private static void Main(string[] args)
        {
            var actionMap = new Dictionary()
            {
                {DataSource.MySql, ConnectionDataHelper.ConnectToMySql},
                {DataSource.SqlServer, ConnectionDataHelper.ConnectToSqlServer},
                {DataSource.MongoDb, ConnectionDataHelper.ConnectToMongoDb},
                {DataSource.Redis, ConnectionDataHelper.ConnectToRedis},
                {DataSource.Xml, ConnectionDataHelper.ConnectToXml},
            };
            DataSource dataSource = DataSource.SqlServer;
            Console.WriteLine("Connection to DB Source: " + dataSource.ToString());
            if (actionMap.ContainsKey(dataSource))
            {
                actionMap[dataSource]();
            }

            Console.ReadKey();
        }

        private enum DataSource
        {
            MySql,
            SqlServer,
            MongoDb,
            Redis,
            Xml
        }
    }

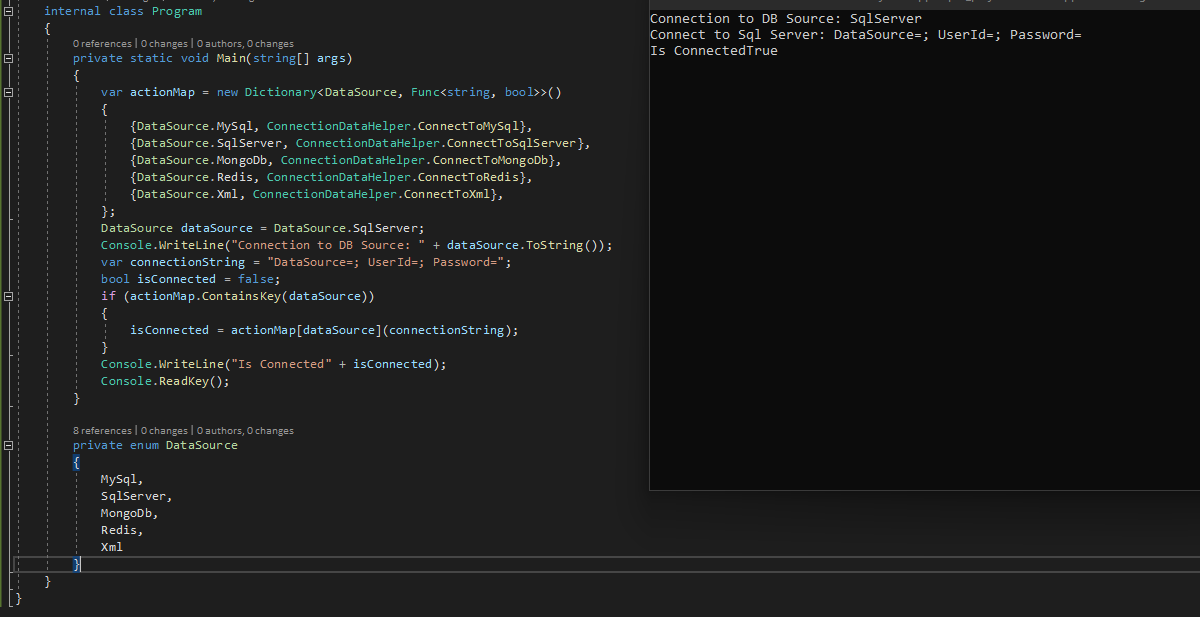
Rõ ràng code đã ngắn gọn hơn rất nhiều. Tất nhiên thực tế các function của chúng ta sẽ phức tạp hơn một chút, có input, output. Bây giờ sửa lại ConnectionDataHelper để nhận vào một connectionString, và return về một trạng thái true/false. IsConnected.

ConnectionDataHelper.cs

    public class ConnectionDataHelper
    {
        public static bool ConnectToMySql(string connectionString)
        {
            Console.WriteLine("Connect to MySql: " + connectionString);
            return true;
        }

        public static bool ConnectToSqlServer(string connectionString)
        {
            Console.WriteLine("Connect to Sql Server: " + connectionString);
            return true;
        }

        public static bool ConnectToMongoDb(string connectionString)
        {
            Console.WriteLine("Connect to MongdoDb: " + connectionString);
            return true;
        }

        public static bool ConnectToRedis(string connectionString)
        {
            Console.WriteLine("Connect to Redis: " + connectionString);
            return true;
        }

        public static bool ConnectToXml(string connectionString)
        {
            Console.WriteLine("Connect to Xml: " + connectionString);
            return true;
        }
    }
internal class Program
    {
        private static void Main(string[] args)
        {
            var actionMap = new Dictionary>()
            {
                {DataSource.MySql, ConnectionDataHelper.ConnectToMySql},
                {DataSource.SqlServer, ConnectionDataHelper.ConnectToSqlServer},
                {DataSource.MongoDb, ConnectionDataHelper.ConnectToMongoDb},
                {DataSource.Redis, ConnectionDataHelper.ConnectToRedis},
                {DataSource.Xml, ConnectionDataHelper.ConnectToXml},
            };
            DataSource dataSource = DataSource.SqlServer;
            Console.WriteLine("Connection to DB Source: " + dataSource.ToString());
            var connectionString = "DataSource=; UserId=; Password=";
            bool isConnected = false;
            if (actionMap.ContainsKey(dataSource))
            {
                isConnected = actionMap[dataSource](connectionString);
            }
            Console.WriteLine("Is Connected" + isConnected);
            Console.ReadKey();
        }

        private enum DataSource
        {
            MySql,
            SqlServer,
            MongoDb,
            Redis,
            Xml
        }
    }

Kết quả:

Chúc các bạn thành công.

Dãy số Fibonacci trong C#

Quy luật của dãy số Fibonacci: số tiếp theo bằng tổng của 2 số trước, 2 số đầu tiên của dãy số là 0, 1. Ví dụ: 0, 1, 1, 2, 3, 5, 8, 13, 21, 34, 55, …

Sử dụng yield trong C# để trả về dãy số Fibonacci

static void Main()
{
 foreach(var value in Fibonacci())
 {
 Console.Write(value + " ");
 if(value > 1000) 
 {
 break;
 }
 }
}

static IEnumerable<int>  Fibonacci()
{
 int current = 0;
 int next = 1;
 while(true)
 {
 yield return current;
 int oldCurrent = current;
 current = next;
 next = next + oldCurrent;
 } 
}

Kết quả:

0 1 1 2 3 5 8 13 21 34 55 89 144 233 377 610 987 1597

Download Or Save Image File From URL

Hướng dẫn này cho phép bạn có thể download một file ((image,video,zip,pdf,doc,xls,ect) từ một đường dẫn url trên website khác, lưu vào ổ cứng hoặc server của bạn. Demo dưới đây viết bằng ASP.NET C#, sẽ lấy ảnh theo đường dẫn http://tuanitpro.com/wp-content/uploads/2014/09/cardvisit.jpg sau đó lưu và thư mục được chỉ định (thư mục Uploads)

Code

void GetFileFromUrl(string fileName, string url)
    {
        byte[] content;
        HttpWebRequest request = (HttpWebRequest)WebRequest.Create(url);
        WebResponse response = request.GetResponse();

        Stream stream = response.GetResponseStream();
        using (BinaryReader reader = new BinaryReader(stream))
        {
            content = reader.ReadBytes(500000);
            reader.Close();
        }
        response.Close();
        FileStream fs = new FileStream(fileName, FileMode.Create);
        BinaryWriter bw = new BinaryWriter(fs);
        try
        {
            bw.Write(content);

        }
        finally
        {
            bw.Close();
            fs.Close();
        }
    }

Code Button Download

 protected void Button1_Click(object sender, EventArgs e)
    {
        string url = "http://tuanitpro.com/wp-content/uploads/2014/09/cardvisit.jpg";
        string fileName = Server.MapPath("~/Uploads") + "\\mylogo.jpg";
        GetFileFromUrl(fileName, url);

        Response.Write("The file has been saved at: " + fileName);
    }

Entity framework update modified fields only

Coding

 public virtual int Update(T entity, params Expression<func<t, object="">>[] properties)
        {
            if (entity.Id < 1)
            {
                return Insert(entity).Id;
            }
            if (properties?.Any() == true)
            {
                _dbContext.Attach(entity);
                foreach (var prop in properties)
                {
                    _dbContext.Entry(entity).Property(prop).IsModified = true;
                }
            }
            else
            {
                _dbContext.Entry(entity).State = EntityState.Modified;
            }

            return _dbContext.SaveChanges();
        }

        public virtual int Update(T entity, object replaceBy)
        {
            if (entity.Id < 1)
            {
                return Insert(entity).Id;
            }
            if (replaceBy == null)
            {
                return _dbContext.SaveChanges();
            }

            var properties = replaceBy.GetType().GetProperties(BindingFlags.Public | BindingFlags.Instance);            
            if (properties?.Any() == true)
            {
                foreach (var prop in properties)
                {
                    var valueOfProp = prop.GetValue(replaceBy, null);
                    var propOfEntity = entity.GetType().GetProperty(prop.Name);
                    propOfEntity.SetValue(entity, Convert.ChangeType(valueOfProp, propOfEntity.PropertyType), null);

                    _dbContext.Entry(entity).Property(propOfEntity.Name).IsModified = true;
                }
            }
            else
            {
                _dbContext.Entry(entity).State = EntityState.Modified;
            }

            return _dbContext.SaveChanges();
        }
</func<t,>

Using

var contact = new Contact { Id = 1, FullName = "Le Thanh Tuan" };

var rs1 = contactService.Update(contact, x => x.FullName);

var rs2 = contactService.Update(contact, new
{
	Id = 1,
	Phone = "0976060432",
	UserName = "tuanitpro",                
	FullName = "Le Thanh Tuan"                             
});

Logging with Serilog, Sentry, ASP.NET Core and ReactJs

Khi phát triển dự án, chúng ta luôn mong muốn sản phẩm làm ra chạy thật ngon, không lỗi, không phàn nàn từ khách hàng.

Tuy nhiên đời không như mơ, đôi khi sự cố vẫn xảy ra. Chính vì vậy logging là việc cần thiết, và cũng có nhiều công cụ hỗ trợ cho việc đó. Trong phạm vi bài viết này, các bạn sẽ được biết thêm một công cụ log ngon lành đơn giản dành cho .NET Core & ReactJs. Đó là https://serilog.net, http://sentry.io. Nếu bạn quan tâm thêm thì có thể tìm hiểu về log4net, nlog…. Có bài viết so sánh tại https://stackify.com/nlog-vs-log4net-vs-serilog/

Bản thân mình đánh giá thằng serilog ngon, mạnh mẽ, dễ áp dụng vào dự án. Nó hỗ trợ rất nhiều loại log: file, console, sentry, elasticsearch…

Sentry.io hiểu đơn giản như một database lưu trữ & cung cấp theo dõi tất cả log của chúng ta. Có bản free, gửi email khi có issue. Đánh giá ngon. Muốn ngon hơn nữa thì dùng bản trả phí. Tuy nhiên bản miễn phí cũng đủ dùng cho dự án nhỏ rồi.


Việc áp dụng khá đơn giản, chúng ta sẽ bắt đầu với dự án ASP.NET Core trước.

Việc đăng ký tạo project trên nó khá đơn giản. Sau khi đăng ký nó sẽ cho bạn một đoạn mã DNS để thêm vào project. Đăng ký tài khoản sentry & tạo project.


Logging with Serilog, Sentry, ASP.NET Core and ReactJs


Logging with Serilog, Sentry, ASP.NET Core and ReactJs


Logging with Serilog, Sentry, ASP.NET Core and ReactJs

Cấu hình sentry vào project. File Program.cs

public class Program
{
	public static void Main(string[] args)
	{
		using (SentrySdk.Init("__DNS__"))
		{
		// App code
		CreateWebHostBuilder(args).Build().Run();
		}
	}

	public static IWebHostBuilder CreateWebHostBuilder(string[] args) 
	{
		WebHost.CreateDefaultBuilder(args)
		.UseKestrel()
		.UseIISIntegration()
		.UseStartup();
	}
}

Cấu hình Serilog File Startup.cs

 		
public Startup(IConfiguration configuration, IHostingEnvironment hostingEnvironment)
{
	Configuration = configuration;

	var builder = new ConfigurationBuilder()
		.SetBasePath(hostingEnvironment.ContentRootPath)
		.AddJsonFile("appsettings.json", optional: true, reloadOnChange: true)
		.AddJsonFile($"appsettings.{hostingEnvironment.EnvironmentName}.json", reloadOnChange: true, optional: true)
		.AddEnvironmentVariables();

	Configuration = builder.Build();            

	Log.Logger = new LoggerConfiguration()
		.Enrich.FromLogContext()
		.Enrich.WithExceptionDetails()                
		.WriteTo.Sentry(o => o.Dsn = new Dsn("__DNS__"))
	.CreateLogger();
}

public void Configure(IApplicationBuilder app, IHostingEnvironment env, ILoggerFactory loggerFactory)
{   
	// TODO
	loggerFactory.AddSerilog();
}

Nếu bạn muốn log trong từng controller thì Serilog cũng hỗ trợ ngon luôn.

using Microsoft.Extensions.Logging;

private readonly ILogger _logger;
public IdentityController(ILogger logger)
{
	_logger = logger;
}

   
public async Task Login(string username, string password)
{
	_logger.LogInformation("Log here");
}

Như vậy xong phần cấu hình cho project .NET Core. Tiếp theo đăng ký sentry project reactjs.

Cài đặt thư viện sentry cho reactjs

npm i @sentry/browser

Thêm đoạn code vào App.js hoặc chỗ nào bạn muốn log.

import * as Sentry from '@sentry/browser'
Sentry.init({
  dsn: '__DNS__'
})
class App extends Component {
  componentDidCatch (error, errorInfo) {
    this.setState({ error })
    Sentry.withScope(scope => {
      scope.setExtras(errorInfo)
      const eventId = Sentry.captureException(error)
      this.setState({ eventId })
    })
  }

Như vậy là xong. Bây giờ chúng ta sẽ vào Sentry.io để xem log của dự án.

Logging with Serilog, Sentry, ASP.NET Core and ReactJs

Happy coding. Chúc các bạn thành công & làm ra sản phẩm không bug, không issue, không phàn nàn từ khách hàng.

Handle errors in ASP.NET Core

if (env.IsDevelopment())
{
app.UseDeveloperExceptionPage();
}
if (env.IsProduction() || env.IsStaging())
{
app.UseExceptionHandler(options =>
{
options.Run(async context =>
{
context.Response.StatusCode = 500;
context.Response.ContentType = “text/plain”;
await context.Response.WriteAsync(“CONTACT: 097 6060 432”);

var exceptionHandlerPathFeature =
context.Features.Get();
var now = System.DateTime.Now;
var eventLog = new EventLog
{
DateCreated = now,
RequestPath = exceptionHandlerPathFeature?.Path,
IPAddress = context.Request.HttpContext.Connection.RemoteIpAddress.ToString(),
Message = exceptionHandlerPathFeature?.Error.Source
};
string eventLogString = JsonConvert.SerializeObject(eventLog);

eventLogString += exceptionHandlerPathFeature?.Error.StackTrace + “\n\r”;

File.AppendAllText(“log.txt”, eventLogString);

ColorLife.Core.Helpers.IEmailProvider emailProvider = new ColorLife.Core.Helpers.EmailProvider(“[Urgent] Bug “, “[email protected]”);
emailProvider.Send(eventLogString, null);
});
});
app.UseHsts();
}

Sử dụng cache trong ASP.NET MVC với Redis Cache, Memory Cache

Khi lập trình ứng dụng chúng ta hay gặp vấn đề làm sao cho tối ưu tài nguyên của hệ thống, tăng tốc độ trải nghiệm từ phía end user. Đặc biệt là các ứng dụng web.

Cache là gì ? 
Lý thuyết: Cache là tên gọi của bộ nhớ đệm – nơi lưu trữ các dữ liệu nằm chờ các ứng dụng hay phần cứng xử lý. Mục đích của nó  để tăng tốc độ xử lý (có sẵn xài liền không cần tốn thời gian đi lùng sục tìm kéo về).

Thực tế: Cache là các dữ liệu trong phiên làm việc trước của các ứng dụng, chương trình mà hệ điều hành lưu lại nhằm giúp việc tải data trong các phiên làm việc sau được nhanh hơn.

Tip này hướng dẫn các bạn cách implement cache vào ứng dụng, sử dụng thư viện đã được wrap lại từ Memery Cache & Redis Cache

Đầu tiên tải về thư viện tại Nuget: https://www.nuget.org/packages/colorlife.tuanitpro.com/

Hoặc cài đặt trực tiếp trong Visual Studio

Tạo class Customer để test

public class Customer
    {
        public string FirstName { get; set; }
        public string LastName { get; set; }
    }

Sử dụng Memory Cache

  private static void MemoryCache_Customer_Test()
        {
            ICacheProviderFactory cacheProvideractory = new CacheProviderFactory();
            IDataCacheProvider dataCacheProvider = cacheProvideractory.CreateFactory();
            Customer customer = new Customer
            {
                FirstName = "Tuan",
                LastName = "Le"
            };
            string cacheKey = "Memory_Cache_Customer";
            dataCacheProvider.Set(cacheKey, customer);
            Console.WriteLine("Before cache: " + customer.FirstName + " " + customer.LastName);
             
            Console.WriteLine("After Update: " + customer.FirstName + " " + customer.LastName);

            var customerInCache = dataCacheProvider.Get(cacheKey);

            Console.WriteLine("Get Customer In MemoryCache: " + customerInCache.FirstName + " " + customerInCache.LastName);
        }

Sử dụng Radis Cache
Đầu tiên tải Redis cho Windows & cài đặt tại: https://github.com/MicrosoftArchive/redis/releases

Code:

  private static void RedisCache_Customer_Test()
        {
            ICacheProviderFactory cacheProvideractory = new CacheProviderFactory(new CacheProviderOptions
            {
                SlidingExpiration = TimeSpan.FromSeconds(30),
                ConnectionString = "localhost:6379" // mặc định
            }, CacheType.Redis);
            IDataCacheProvider dataCacheProvider = cacheProvideractory.CreateFactory();
            Customer customer = new Customer
            {
                FirstName = "Tuan",
                LastName = "Le"
            };
            string cacheKey = "RedisCache_Customer";
            dataCacheProvider.Set(cacheKey, customer);
            Console.WriteLine("Before cache: " + customer.FirstName + " " + customer.LastName);
            Thread.Sleep(5000);
            customer.LastName = "Le_Updated";
            Console.WriteLine("After Update: " + customer.FirstName + " " + customer.LastName);

            var customerInCache = dataCacheProvider.Get(cacheKey);

            Console.WriteLine("Customer In RedisCache: " + customerInCache.FirstName + " " + customerInCache.LastName);
        }

Thư viện còn hỗ trợ một số chức năng nho nhỏ khác, sẽ nói trong bài viết khác. Chúc các bạn thành công ?

Utilities javascript, angualr js

Hướng dẫn convert một Json object về List Object trong javascript JSON. Trường hợp backend trả về 1 object, ví dụ Dictionary…

const jsonObject = {'key1':'value1', 'key2':'value2', 'key3':'value3'};
console.log(jsonObject);
const list = [];
for (const key in jsonObject) {
  if (jsonObject.hasOwnProperty(key)) {
    const temp = {
      Id: key,
      Name: jsonObject[key]
    };
    list.push(temp);
  }
}
console.log(list);

Merge(trộn) 2 object thành 1 object thứ 3, có tất cả thuộc tính & giá trị của 1 & 2.

const resources  = {
  search: 'Search',
  reset: 'Reset',
  save: 'Save change',
  cancel: 'Cancel',
  edit: 'Edit',
  remove: 'Remove',
  add_new: 'Add new',
  tools: 'Tools',        
}
console.log(resources);
const resources_setting = {        
  key: 'Key',
  value: 'Value'        
};
console.log(resources_setting);
function adapter(itemA) {
  for (const key in resources) {
    if (resources.hasOwnProperty(key)) {
      itemA[key] = resources[key];
    }
  }
  return itemA;
}
const resourcesOutput = adapter(resources_setting);
console.log(resourcesOutput);