How to Upload Multiple Files React Native

Khi lập trình ứng dụng mobile, có khá nhiều thứ liên quan đến hình ảnh. Hướng dẫn sau đây sẽ giúp bạn có thể upload nhiều hình ảnh trong app React Native, tương tự Facebook hay instagram…

Chuẩn bị

Trong hướng dẫn này sử dụng api code dot.net core. Bạn có thể sử dụng ngôn ngữ khác như nodejs, php, java… Bạn có thể tham khảo thêm tại đây.

Trong React Native sử dụng 3 thư viện

npm install react-native-image-crop-picker'
npm install react-native-actionsheet
npm install axios

Các bạn tham khảo thêm ở github của thư viện để biết cách cấu hình chi tiết.

Code backend API

[HttpPost]
[Route("")]
public async Task<IActionResult> Post([FromForm]List<IFormFile> files)
{
    try
    {
        var today = DateTime.Today;
        var uploadPath = @"C:\web\files\files"; // Path.Combine(_hostingEnvironment.WebRootPath, "Content", "Files");
        uploadPath += $"\\{today.Year}\\{today.Month}".PadLeft(2, '0');
        if (!Directory.Exists(uploadPath))
        {
            Directory.CreateDirectory(uploadPath);
        }
        
        var fileUrls = new List<string>();
        foreach (var file in files)
        {
            if (file.Length > 0)
            {
                var fileExtension = Path.GetExtension(file.FileName);
                string fileName = $"{FileHelper.GenerateUniqueFileName}{fileExtension}";
                await file.CopyToAsync(stream);
                var fileUrl = $"files/{today.Year}/{today.Month}".PadLeft(2, '0') + "/" + fileName;
                fileUrls.Add(fileUrl);
            }
        }

        var fileItemResponse = new ResultDataObject
        {
            Data = fileUrls,
            Code = (int)ErrorCodeResultEnum.Ok,
            Message = "Ok"
        };
        return Ok(fileItemResponse);
    }
    catch (Exception ex)
    {
        var fileItemResponse = new ResultDataObject
        {
            Message = ex.Message,
            Code = (int)ErrorCodeResultEnum.Failure
        };
        return Ok(fileItemResponse);
    }
}

Code React Native

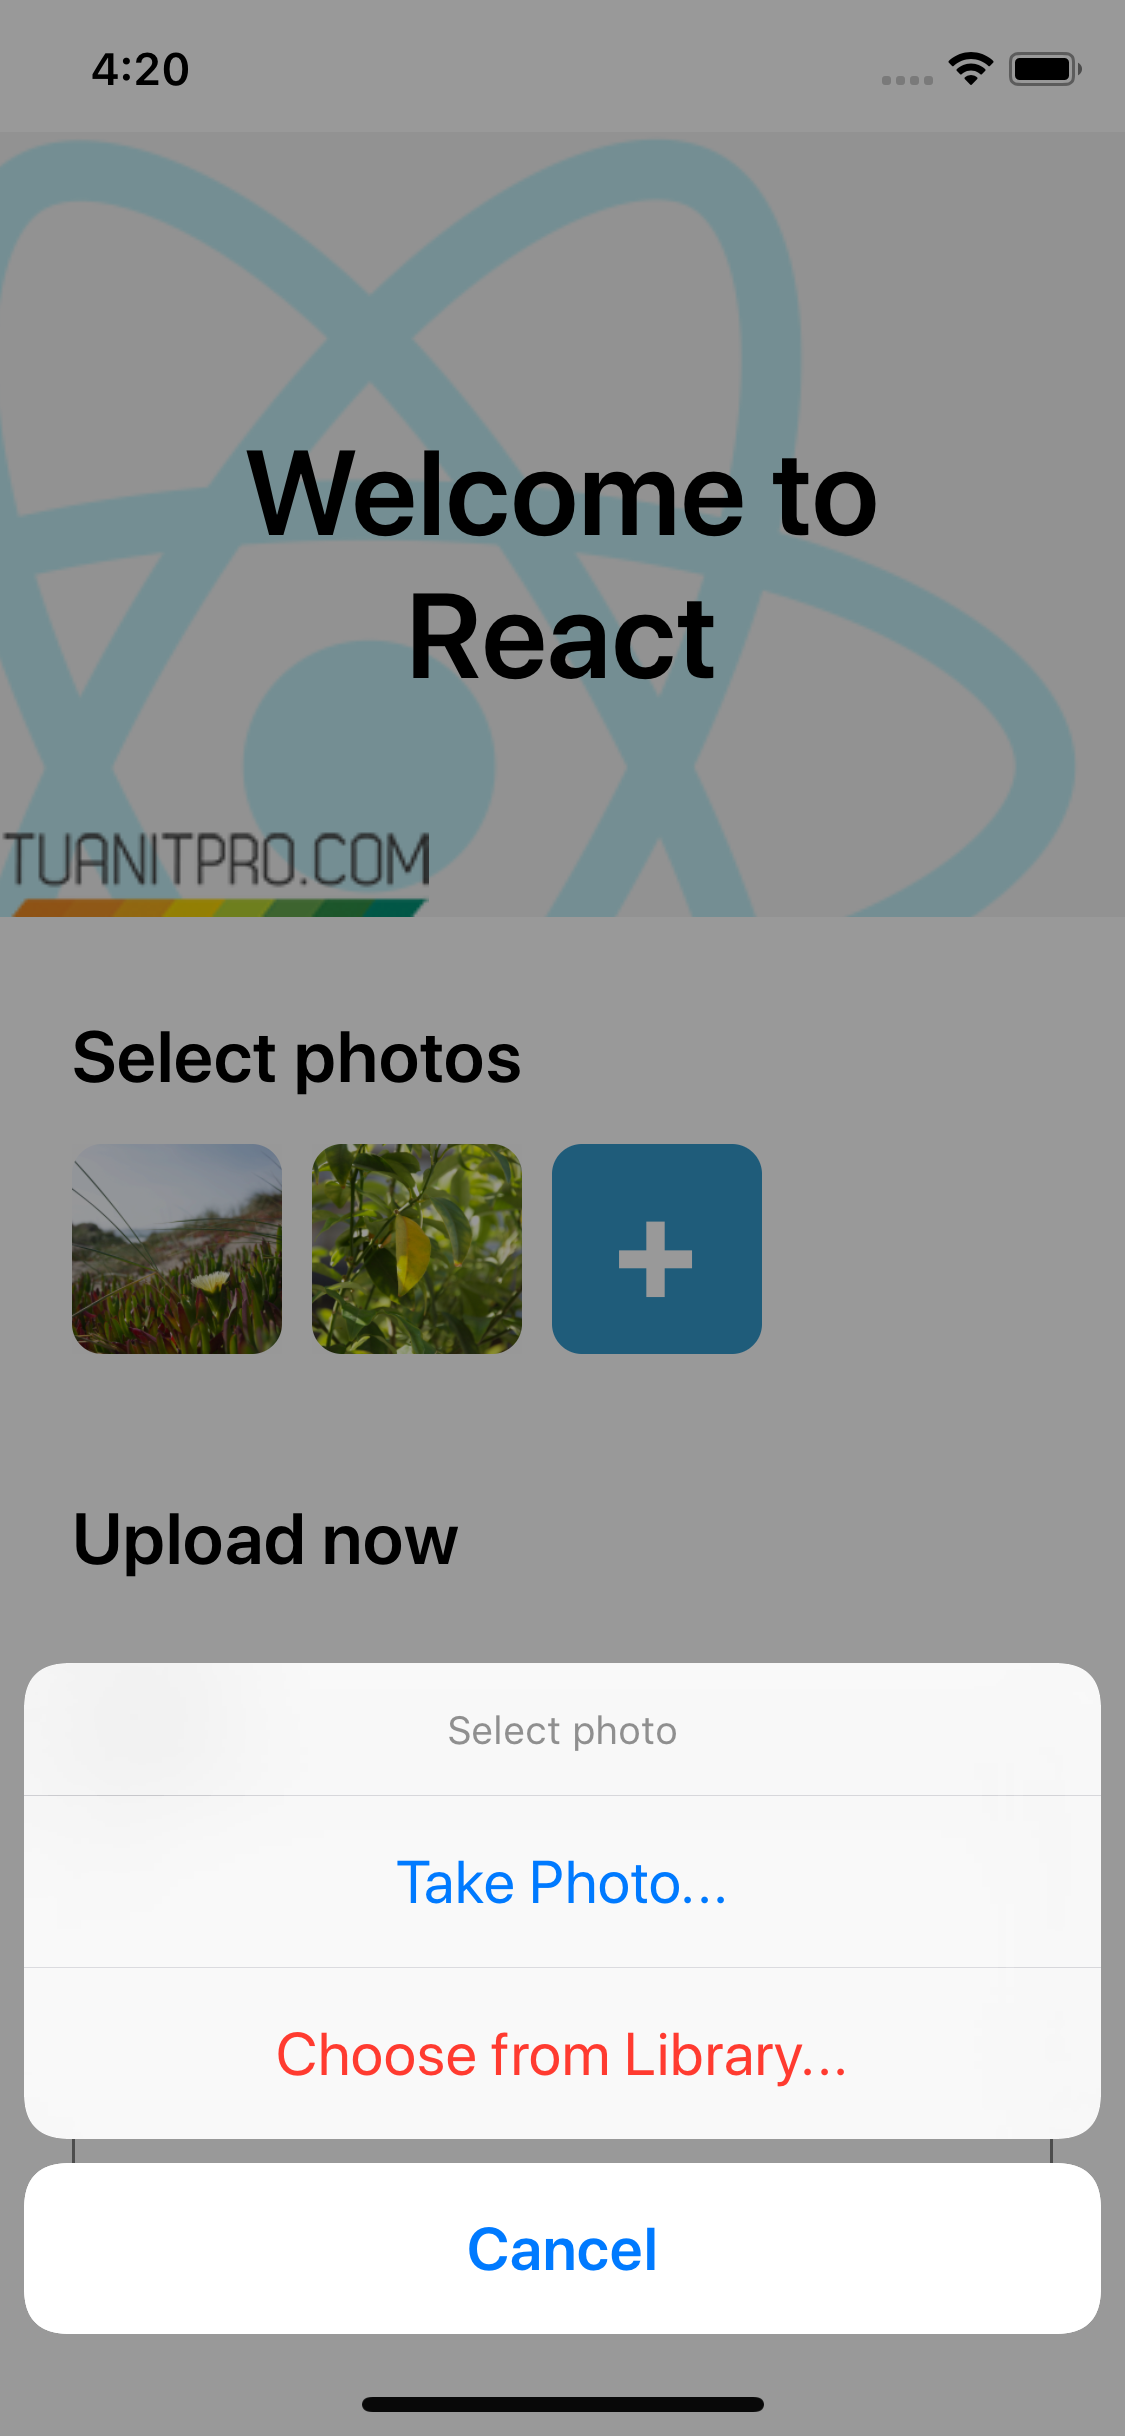
Chọn ảnh từ thư viện sử dụng ImagePicker, sử dụng state để lưu lại ảnh đã chọn

onActionSelectPhotoDone = index => {
    switch (index) {
      case 0:
        ImagePicker.openCamera({}).then(image => {
          this.setState({
            localPhotos: [...this.state.localPhotos, image]
          });
        });
        break;
      case 1:
        ImagePicker.openPicker({
          multiple: true,
          maxFiles: 10,
          mediaType: 'photo'
        }).then(images => {
          images.forEach((image) => {
           this.setState({
            localPhotos: [...this.state.localPhotos, image]
          });
          });
        }).catch(error => {
          alert(JSON.stringify(error));
        });
        break;
      default:
        break;
    }
  };

Code hiển thị hình ảnh sau khi chọn

renderListPhotos = localPhotos => {
    const photos = localPhotos.map((photo, index) => (
      <TouchableOpacity key={index}
        onPress={() => {
           this.showActionSheet(index);
        }}
      >
        <Image style={styles.photo} source={{ uri: photo.path }} />
      </TouchableOpacity>
    ));

    return photos;
  };

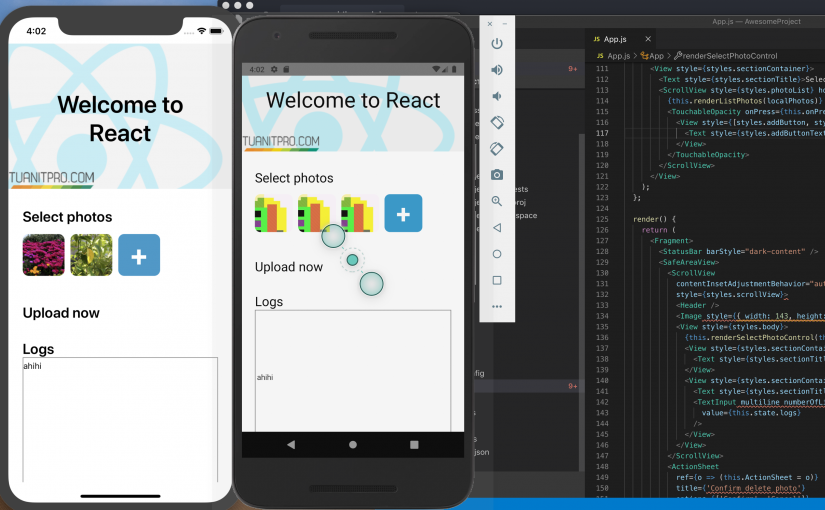
  renderSelectPhotoControl = localPhotos => {
    return (
      <View style={styles.sectionContainer}>
        <Text style={styles.sectionTitle}>Select photos</Text>
        <ScrollView style={styles.photoList} horizontal={true}>
          {this.renderListPhotos(localPhotos)}
          <TouchableOpacity onPress={this.onPressAddPhotoBtn.bind(this)}>
            <View style={[styles.addButton, styles.photo]}>
              <Text style={styles.addButtonText}>+</Text>
            </View>
          </TouchableOpacity>
        </ScrollView>
      </View>
    );
  };

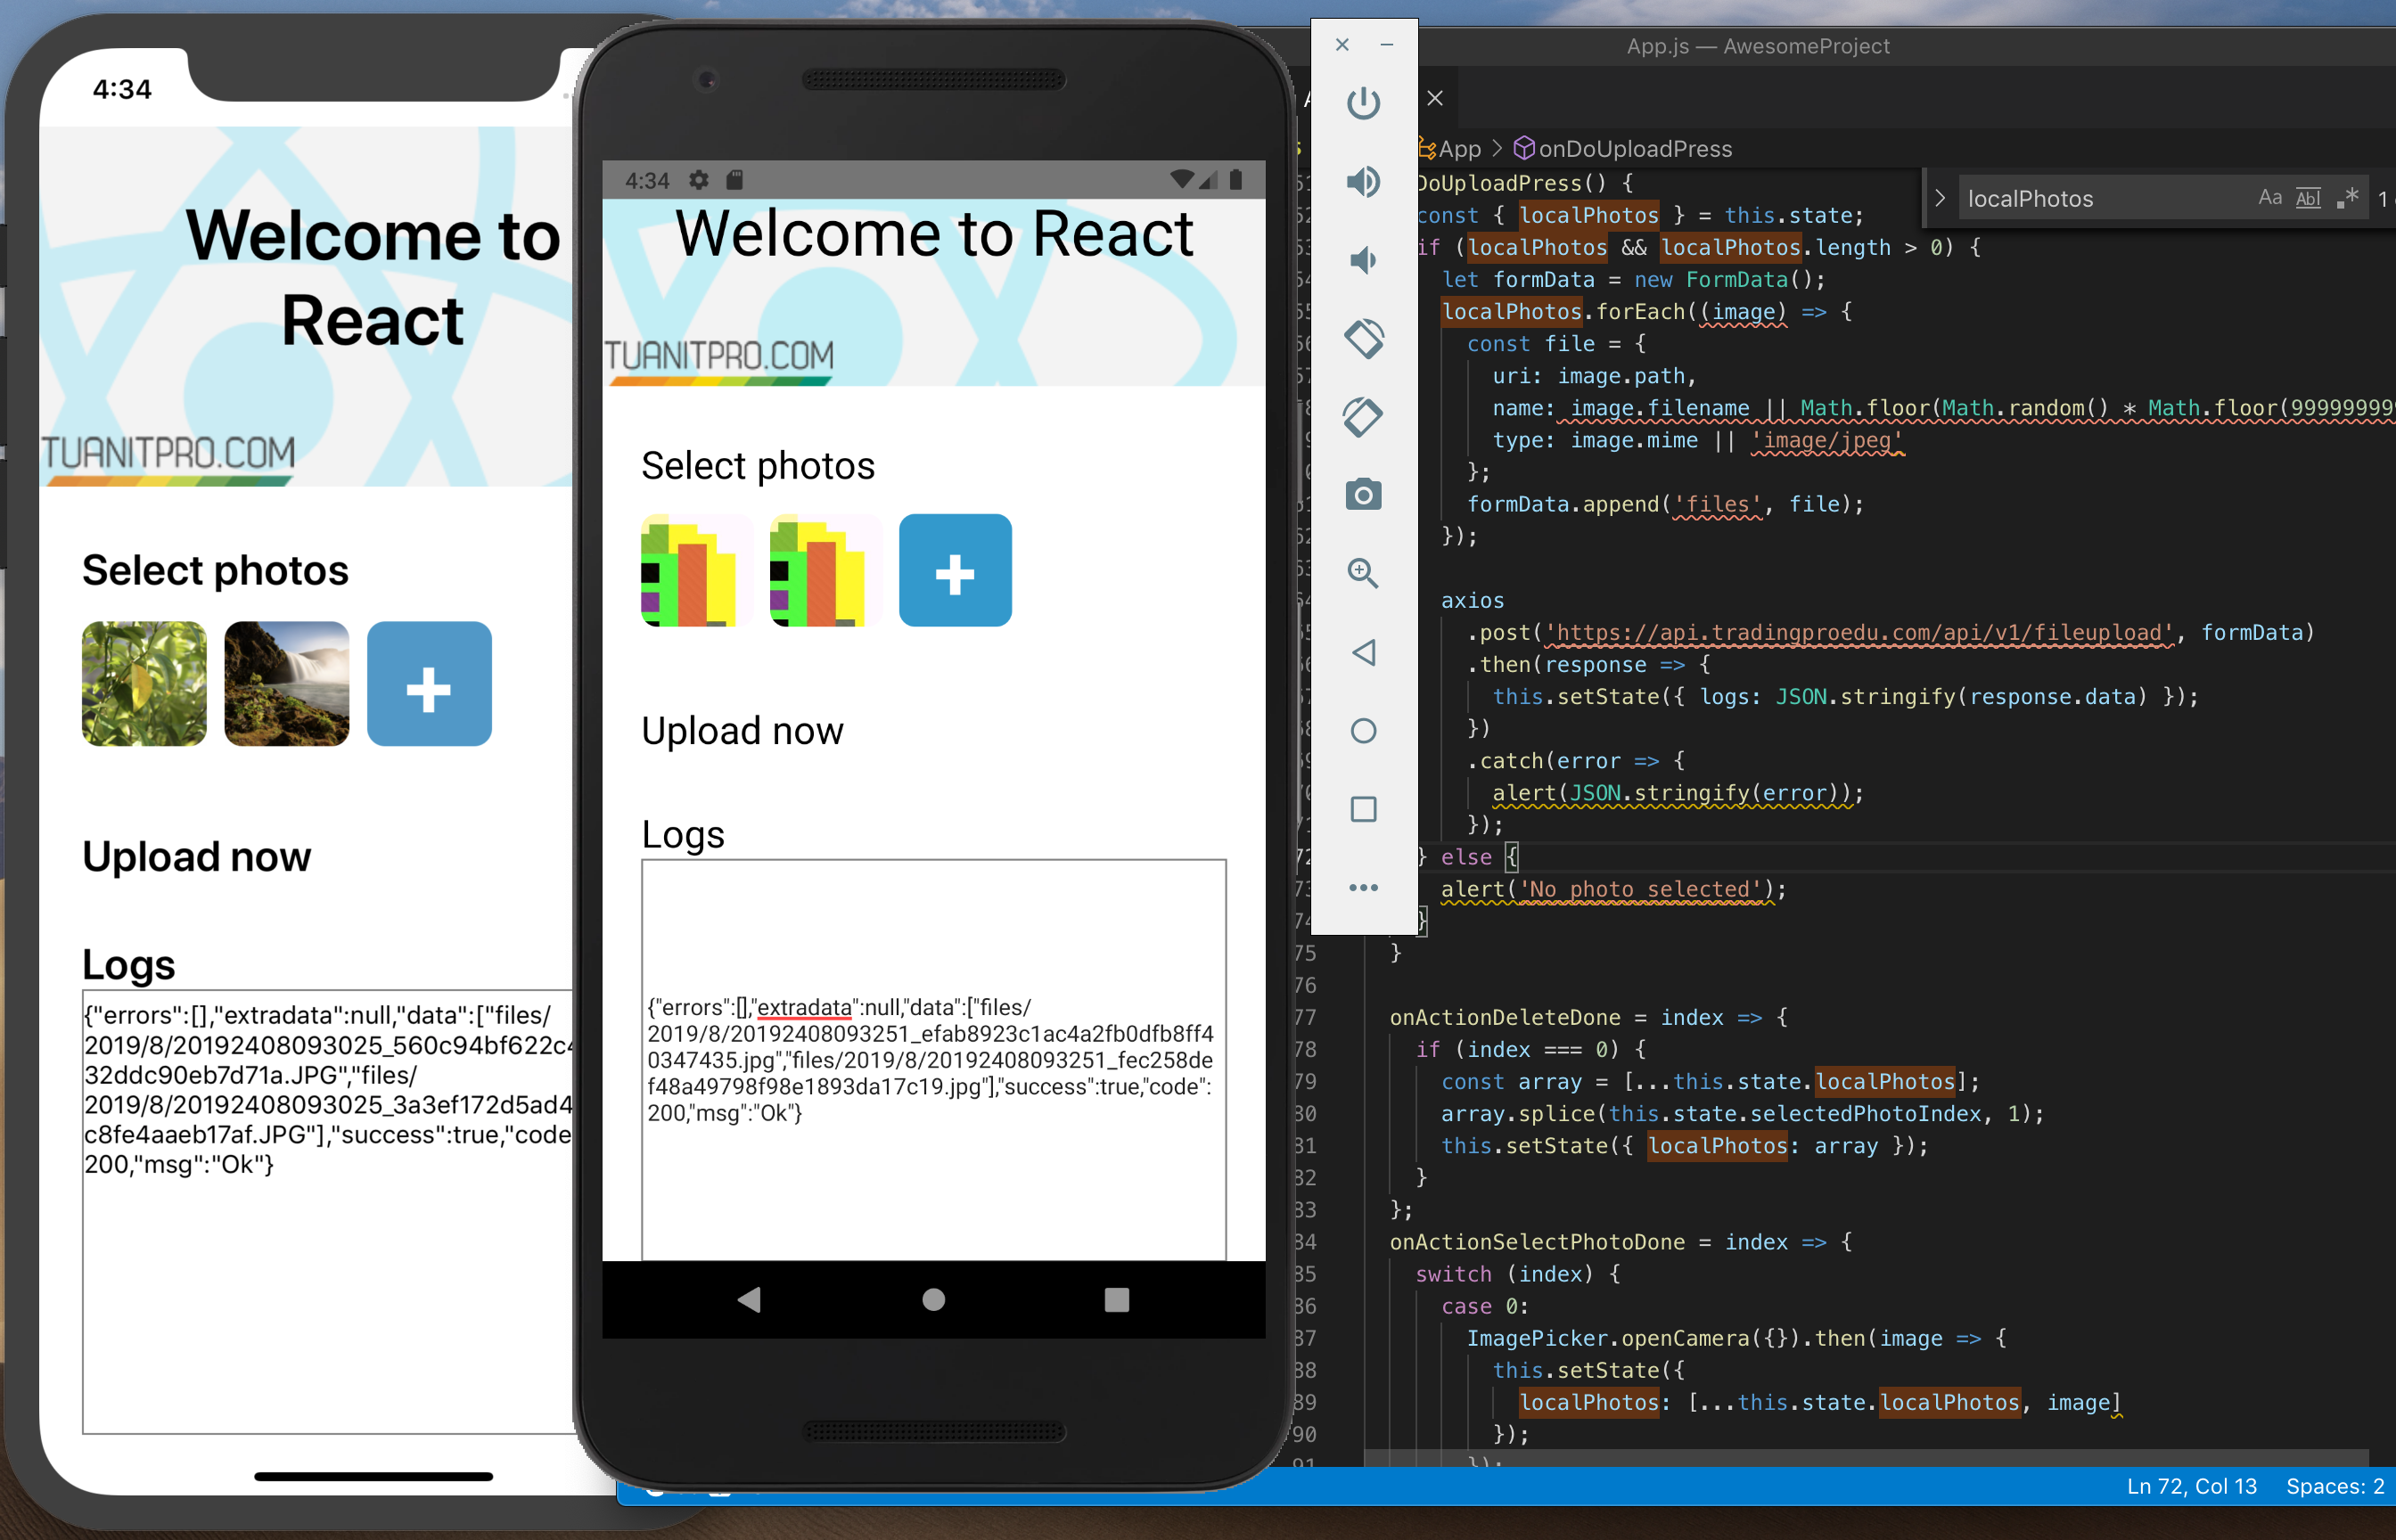
Sử dụng axios & FormData để Upload

  onDoUploadPress() {
    const { localPhotos } = this.state;
    if (localPhotos && localPhotos.length > 0) {
      let formData = new FormData();
      localPhotos.forEach((image) => {
        const file = {
          uri: image.path,
          name: image.filename || Math.floor(Math.random() * Math.floor(999999999)) + '.jpg',
          type: image.mime || 'image/jpeg'
        };
        formData.append('files', file);
      });

      axios
        .post('https://api.tradingproedu.com/api/v1/fileupload', formData)
        .then(response => {
          this.setState({ logs: JSON.stringify(response.data) });
        })
        .catch(error => {
          alert(JSON.stringify(error));
        });
    } else {
      alert('No photo selected');
    }
  }

Chúc các bạn thành công.

Full source code https://github.com/tuanitpro/react-native-upload-files

Entity framework update modified fields only

Coding

 public virtual int Update(T entity, params Expression<func<t, object="">>[] properties)
        {
            if (entity.Id < 1)
            {
                return Insert(entity).Id;
            }
            if (properties?.Any() == true)
            {
                _dbContext.Attach(entity);
                foreach (var prop in properties)
                {
                    _dbContext.Entry(entity).Property(prop).IsModified = true;
                }
            }
            else
            {
                _dbContext.Entry(entity).State = EntityState.Modified;
            }

            return _dbContext.SaveChanges();
        }

        public virtual int Update(T entity, object replaceBy)
        {
            if (entity.Id < 1)
            {
                return Insert(entity).Id;
            }
            if (replaceBy == null)
            {
                return _dbContext.SaveChanges();
            }

            var properties = replaceBy.GetType().GetProperties(BindingFlags.Public | BindingFlags.Instance);            
            if (properties?.Any() == true)
            {
                foreach (var prop in properties)
                {
                    var valueOfProp = prop.GetValue(replaceBy, null);
                    var propOfEntity = entity.GetType().GetProperty(prop.Name);
                    propOfEntity.SetValue(entity, Convert.ChangeType(valueOfProp, propOfEntity.PropertyType), null);

                    _dbContext.Entry(entity).Property(propOfEntity.Name).IsModified = true;
                }
            }
            else
            {
                _dbContext.Entry(entity).State = EntityState.Modified;
            }

            return _dbContext.SaveChanges();
        }
</func<t,>

Using

var contact = new Contact { Id = 1, FullName = "Le Thanh Tuan" };

var rs1 = contactService.Update(contact, x => x.FullName);

var rs2 = contactService.Update(contact, new
{
	Id = 1,
	Phone = "0976060432",
	UserName = "tuanitpro",                
	FullName = "Le Thanh Tuan"                             
});

Handle errors in ASP.NET Core

if (env.IsDevelopment())
{
app.UseDeveloperExceptionPage();
}
if (env.IsProduction() || env.IsStaging())
{
app.UseExceptionHandler(options =>
{
options.Run(async context =>
{
context.Response.StatusCode = 500;
context.Response.ContentType = “text/plain”;
await context.Response.WriteAsync(“CONTACT: 097 6060 432”);

var exceptionHandlerPathFeature =
context.Features.Get();
var now = System.DateTime.Now;
var eventLog = new EventLog
{
DateCreated = now,
RequestPath = exceptionHandlerPathFeature?.Path,
IPAddress = context.Request.HttpContext.Connection.RemoteIpAddress.ToString(),
Message = exceptionHandlerPathFeature?.Error.Source
};
string eventLogString = JsonConvert.SerializeObject(eventLog);

eventLogString += exceptionHandlerPathFeature?.Error.StackTrace + “\n\r”;

File.AppendAllText(“log.txt”, eventLogString);

ColorLife.Core.Helpers.IEmailProvider emailProvider = new ColorLife.Core.Helpers.EmailProvider(“[Urgent] Bug “, “[email protected]”);
emailProvider.Send(eventLogString, null);
});
});
app.UseHsts();
}