Sử dụng cache trong ASP.NET MVC với Redis Cache, Memory Cache

Khi lập trình ứng dụng chúng ta hay gặp vấn đề làm sao cho tối ưu tài nguyên của hệ thống, tăng tốc độ trải nghiệm từ phía end user. Đặc biệt là các ứng dụng web.

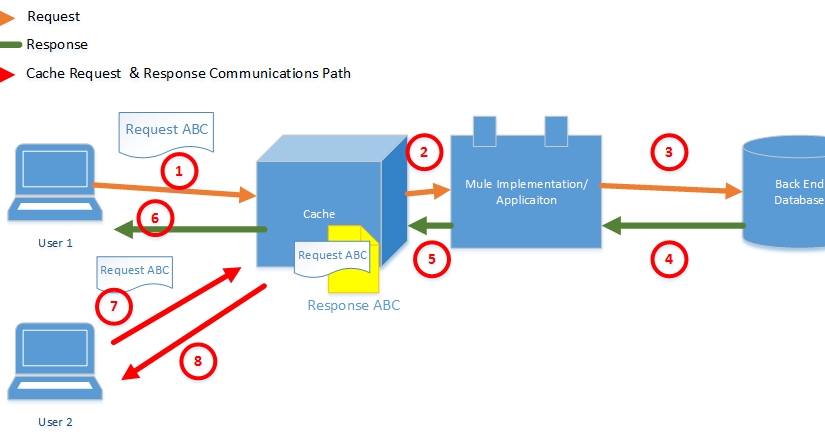
Cache là gì ? 
Lý thuyết: Cache là tên gọi của bộ nhớ đệm – nơi lưu trữ các dữ liệu nằm chờ các ứng dụng hay phần cứng xử lý. Mục đích của nó  để tăng tốc độ xử lý (có sẵn xài liền không cần tốn thời gian đi lùng sục tìm kéo về).

Thực tế: Cache là các dữ liệu trong phiên làm việc trước của các ứng dụng, chương trình mà hệ điều hành lưu lại nhằm giúp việc tải data trong các phiên làm việc sau được nhanh hơn.

Tip này hướng dẫn các bạn cách implement cache vào ứng dụng, sử dụng thư viện đã được wrap lại từ Memery Cache & Redis Cache

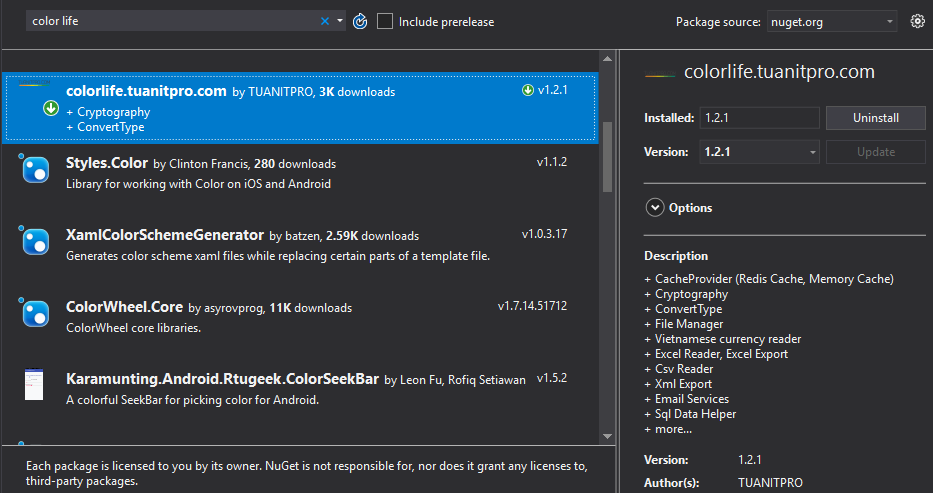
Đầu tiên tải về thư viện tại Nuget: https://www.nuget.org/packages/colorlife.tuanitpro.com/

Hoặc cài đặt trực tiếp trong Visual Studio
Tạo class Customer để test

public class Customer
    {
        public string FirstName { get; set; }
        public string LastName { get; set; }
    }

Sử dụng Memory Cache

  private static void MemoryCache_Customer_Test()
        {
            ICacheProviderFactory cacheProvideractory = new CacheProviderFactory();
            IDataCacheProvider dataCacheProvider = cacheProvideractory.CreateFactory();
            Customer customer = new Customer
            {
                FirstName = "Tuan",
                LastName = "Le"
            };
            string cacheKey = "Memory_Cache_Customer";
            dataCacheProvider.Set(cacheKey, customer);
            Console.WriteLine("Before cache: " + customer.FirstName + " " + customer.LastName);
             
            Console.WriteLine("After Update: " + customer.FirstName + " " + customer.LastName);

            var customerInCache = dataCacheProvider.Get(cacheKey);

            Console.WriteLine("Get Customer In MemoryCache: " + customerInCache.FirstName + " " + customerInCache.LastName);
        }

Sử dụng Radis Cache
Đầu tiên tải Redis cho Windows & cài đặt tại: https://github.com/MicrosoftArchive/redis/releases

Code:

  private static void RedisCache_Customer_Test()
        {
            ICacheProviderFactory cacheProvideractory = new CacheProviderFactory(new CacheProviderOptions
            {
                SlidingExpiration = TimeSpan.FromSeconds(30),
                ConnectionString = "localhost:6379" // mặc định
            }, CacheType.Redis);
            IDataCacheProvider dataCacheProvider = cacheProvideractory.CreateFactory();
            Customer customer = new Customer
            {
                FirstName = "Tuan",
                LastName = "Le"
            };
            string cacheKey = "RedisCache_Customer";
            dataCacheProvider.Set(cacheKey, customer);
            Console.WriteLine("Before cache: " + customer.FirstName + " " + customer.LastName);
            Thread.Sleep(5000);
            customer.LastName = "Le_Updated";
            Console.WriteLine("After Update: " + customer.FirstName + " " + customer.LastName);

            var customerInCache = dataCacheProvider.Get(cacheKey);

            Console.WriteLine("Customer In RedisCache: " + customerInCache.FirstName + " " + customerInCache.LastName);
        }

Thư viện còn hỗ trợ một số chức năng nho nhỏ khác, sẽ nói trong bài viết khác. Chúc các bạn thành công ?

LÀM ĐÀN ÔNG ĐỪNG CÁI GÌ CŨNG CỐ GIỎI, CHỈ CẦN XUẤT CHÚNG MỘT KỸ NĂNG, CẢ ĐỜI BẠN SẼ NỞ HOA

Người xưa đã có câu “nhất nghệ tinh, nhất thân vinh, hay một nghề cho chín, còn hơn chín nghề.”  Nhưng đọc thêm bài viết dài một chút cũng không hẳn là một ý tồi.

Đứa bạn 1: Tôi có thể thiết kế rất giỏi

Đứa bạn 2: Tôi là một huấn luyện viên gym rất xuất sắc

Đồng nghiệp 1: Tôi cực kỳ giỏi việc nịnh sếp

Đồng nghiệp 2: Tôi thực sự rất giỏi việc đóng clip hài

Tôi: Tôi có thể làm mọi thứ mà các ông làm

1. Có một sự thật là khi bạn giỏi mọi thứ, thực ra bạn lại chẳng thực sự giỏi một thứ gì. Ngoại trừ những “siêu nhân” biết tuốt, mỗi người trên cuộc đời này chỉ thực sự vĩ đại trong một lĩnh vực hay kỹ năng gì đó, và đó là thứ sẽ nuôi sống người đàn ông cả cuộc đời.

2. Trường học dạy chúng ta phải có điểm cao ở mọi môn, nhưng trường đời chỉ thực sự cần bạn là chuyên gia trong một lĩnh vực mà thôi. Như các cụ đã nói, một nghề cho chín còn hơn chín nghề.

3. Trong cuốn sách Average is Over (Tạm dịch: Sự chấm hết của trung bình), kinh tế gia Tyler Cowen cho rằng kỷ nguyên của sự “bình thường” sắp chấm dứt.

Chỉ vào chục năm nữa, khi robot bắt đầu thay thế các công việc đòi hỏi kỹ năng tầm thấp hoặc trung bình, chiến lược sống sót duy nhất của bạn là phải giỏi ở một thứ, chỉ cần một mà thôi.

5. Giỏi nhiều thứ mới dễ, xuất chúng ở một ngành nghề mới thực sự khó. Khi bạn nghe thấy một đứa bạn, vừa đánh đàn giỏi, vừa học giỏi, vừa kinh doanh giỏi, vừa làm chồng giỏi, vừa làm bố giỏi… nói chung cái gì cũng giỏi, thì tốt nhất hãy xem gia thế của bạn ấy là ai trước.

Vì sự thực là, sẽ luôn có chi phí cơ hội, cực kỳ hiếm người có thể xuất sắc ở mọi lĩnh vực. Ngoài ra, thì để cái gì cũng biết thì vô cùng dễ, để thực sự là chuyên gia đầu ngành của một lĩnh vực thì đòi hỏi sức kiên trì lớn hơn rất nhiều.

6. Quy luật 10,000 giờ. Để thực sự xuất chúng ở một chuyên ngành nào đó, bạn cần bỏ ra ít nhất 10,000 giờ cho chúng. Nghe thì không to lắm, nhưng để ngày nào cũng bỏ ra 2-3 tiếng “luyện công” thì bạn thực sự cần có kỹ năng kỷ luật bản thân rất tốt. Nhưng biết làm sao được, nếu ghế của cha bạn không to, nhà bạn không giàu, thì đó dường như là con đường duy nhất dẫn đến thành công.

7. “Tạm được là chưa đủ.” Chắc chắc đôi khi bạn sẽ gặp những sếp dễ tính, và khi bạn nộp một sản phẩm chưa hoàn hảo nhất với sức lực của mình, họ đã khen “Em làm tốt rồi”. Cái lợi của việc này là bạn cảm thấy được trân trọng, nhưng thực ra ông sếp đang làm hại bạn.

Thỏa mãn bản thân với những kết quả chưa thực sự “chín” sẽ làm bạn mất thái độ cầu toàn, và khó có thể leo lên tầm chuyên gia, khi những việc nhỏ còn làm chưa trọn vẹn.

8. Kiên nhẫn không phải dễ dàng. Nó đau đớn và cực kỳ nhọc nhằn. Thành công chưa bao giờ là dễ. Tập trung vào một điểm mạnh của mình và đưa nó lên “cấp” cao nhất chưa bao giờ là dễ dàng. Bạn sẽ gặp khó khăn, bạn sẽ nản và muốn nhảy vòng quanh để giỏi ở mọi thứ, nhưng đó là cái bẫy.

Thời trai trẻ, đừng lãng phí.

Từ năm 20-30 tuổi, siêu tập trung vào chỉ một lĩnh vực, trở thành chuyên gia hàng đầu trong lĩnh vực đó, ngành nghề gì cũng được, và bạn sẽ không phải hối hận.

Nguồn: Tri thức trẻ
Ảnh: happy.live

Tạo bot discord check giá coinmarketcap

Các thư viện sử dụng

https://discord.js.org

https://www.npmjs.com/package/node-fetch

Yêu cầu máy đã cài nodejs

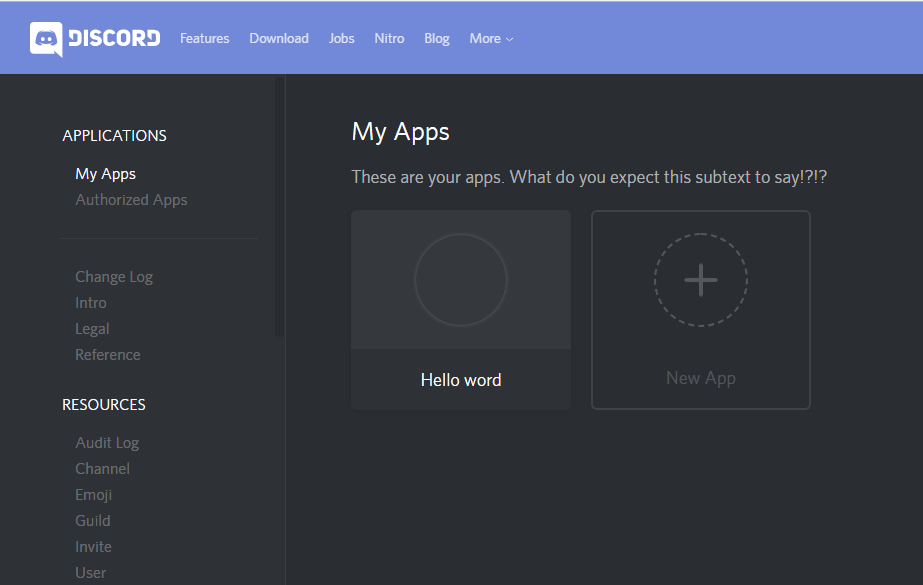
Tạo app trên discord: https://discordapp.com/developers/docs/intro

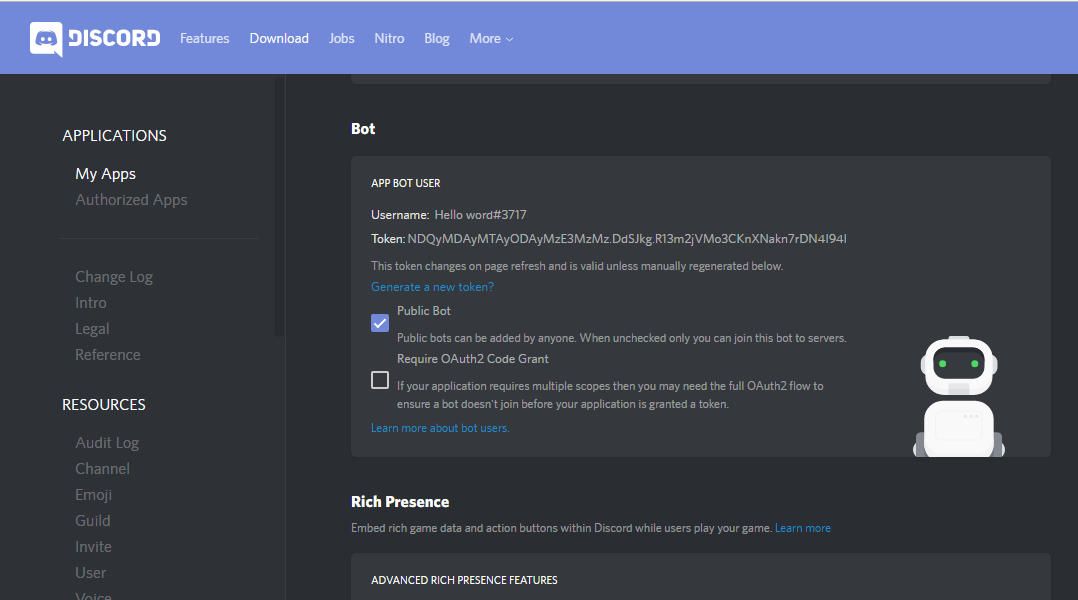
Lấy token để sử dụng sau:

Sử dụng Visual Code để code.

Tạo file bot.js

Code:

npm install discord.js

const Discord = require('discord.js');
const client = new Discord.Client();

const commandPrefix = "!";

client.on('ready', () => {
  console.log(`Logged in as ${client.user.tag}!`);
});

client.on('message', (message)=> {
    if(!message.content.startsWith(commandPrefix)) return;
    const args = message.content.slice(commandPrefix.length).trim().split(/ +/g);
    const command = args.shift().toLowerCase();
       
    switch(command){
    	case "hello":
			hello(message);
    	break;
    	case "help":
			help(message);
    	break;
    	case "ping":
			sendText(message, "Pong");
    	break;
    	case "clear":
    		clear(message);
    	break;
    	case "cmc":
    		coinmarketcap(message);
    	break;
    	case "c":
    		chart(message, args);
    	break;
    	case "p":
    		price(message, args);
    	break;    	
    	default:
    		sendText(message, "Command not found.")
    	break;
    }
});

client.login('NDQyMDAyMTAyODAyMzE3MzMz.DdMfbw.3eV-Qk5N2TpDIDgatQb1ILeD0Hc');

Các hàm chính trong bot

function hello(message){
	message.channel.send("Hello " + message.author + "! Nice to meet you. :smiley: ");
}
function help(message){
	 let embed = new Discord.RichEmbed()            
            .setAuthor("Hello world", "http://icons.iconarchive.com/icons/froyoshark/enkel/256/Bitcoin-icon.png")
            .addField("!hello", "Sends a friendly message!")
            .addField("!help", "Sends this help embed")
            .addField("!cmc", "Coin Market Cap")
            .addField("!ping", "Ping")
            .addField("!p", "Price of coin. Ex: BTCUSDT or price BTC")
            .setTitle("Bot commands:")
            .setFooter("Here you have all bot commands you can use!")
            .setColor("AQUA");        
        message.channel.send({embed: embed});
}
function sendText(message, text){
	message.channel.send(text).then(msg=>{msg.delete(10000)}); 
    message.delete(12000);
}

function clear(message){
	if (message.member.hasPermission("MANAGE_MESSAGES")) {
        message.channel.fetchMessages()
           .then(function(list){
                message.channel.bulkDelete(list);
            }, function(err){message.channel.send("ERROR: ERROR CLEARING CHANNEL.")})                        
    }
    else{
    	console.log("You don't have permission");
    }

Hàm lấy giá trên coinmarketcap.com

npm install node-fetch

function coinmarketcap(message){
	    let url = 'https://api.coinmarketcap.com/v2/global/';	
		let bitcoin_percentage_of_market_cap='';
		let total_market_cap= '';
		let total_volume_24h = '';
		let last_updated = '';
		fetch(url)
    	.then(res => res.json())
    	.then(json => {
    		// console.log(json);
    		bitcoin_percentage_of_market_cap =  json.data.bitcoin_percentage_of_market_cap;
    		total_market_cap = json.data.quotes.USD.total_market_cap;
 			total_volume_24h = json.data.quotes.USD.total_volume_24h;
 			last_updated = json.data.last_updated;
			
 			let embed = new Discord.RichEmbed()
 			.setAuthor("Coinmarketcap", "http://icons.iconarchive.com/icons/froyoshark/enkel/256/Bitcoin-icon.png")
            .addField("Market Cap (USD):", numberFormat(total_market_cap))
            .addField("24h Vol (USD): ", numberFormat(total_volume_24h))
            .addField("BTC Dominance(%): ", bitcoin_percentage_of_market_cap)            
            .setFooter("Last Updated: " + timeConverter(last_updated))
            .setColor("AQUA");

        // Send the embed with message.channel.send()
        message.channel.send({embed: embed}).then(msg=>{msg.delete(10000)}); 
        message.delete(12000);       
    	});    	 
}

Thêm bot vào Server Discord

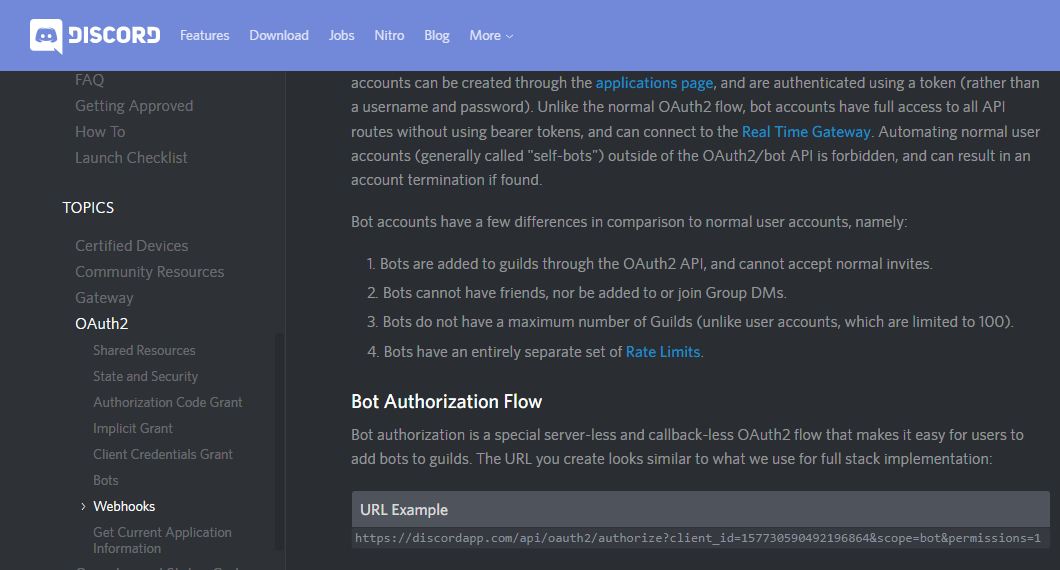
Open link & thay bằng client_id của bạn trên trình duyệt

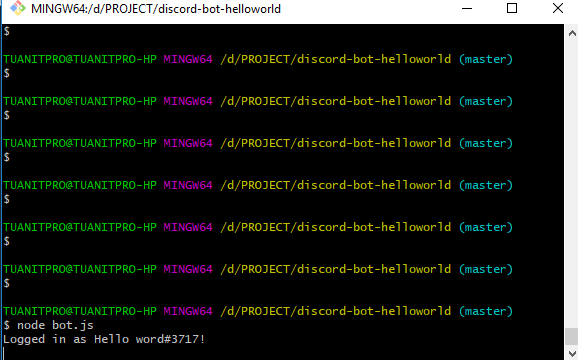
Khởi chạy bot

node bot.js

Demo


Source code:  GitHub

Chúc các bạn thành công

DONATE

Bitcoin address: 1tmxPQbmycQMehAAZ8FshbvEoQZ6Ri7PT

ETH Address: 0xfe17aaf16bceb4311795b2e8ff0199640bdce54a

ETC Address: 0xfe17aaf16bceb4311795b2e8ff0199640bdce54a

XVG Address: D9iP7fhKbHJKViwUG9MWcAt3JPdCuxnCZJ

Utilities javascript, angualr js

Hướng dẫn convert một Json object về List Object trong javascript JSON. Trường hợp backend trả về 1 object, ví dụ Dictionary…

const jsonObject = {'key1':'value1', 'key2':'value2', 'key3':'value3'};
console.log(jsonObject);
const list = [];
for (const key in jsonObject) {
  if (jsonObject.hasOwnProperty(key)) {
    const temp = {
      Id: key,
      Name: jsonObject[key]
    };
    list.push(temp);
  }
}
console.log(list);

Merge(trộn) 2 object thành 1 object thứ 3, có tất cả thuộc tính & giá trị của 1 & 2.

const resources  = {
  search: 'Search',
  reset: 'Reset',
  save: 'Save change',
  cancel: 'Cancel',
  edit: 'Edit',
  remove: 'Remove',
  add_new: 'Add new',
  tools: 'Tools',        
}
console.log(resources);
const resources_setting = {        
  key: 'Key',
  value: 'Value'        
};
console.log(resources_setting);
function adapter(itemA) {
  for (const key in resources) {
    if (resources.hasOwnProperty(key)) {
      itemA[key] = resources[key];
    }
  }
  return itemA;
}
const resourcesOutput = adapter(resources_setting);
console.log(resourcesOutput);

Cascading Dropdown Ajax

Chào các bạn

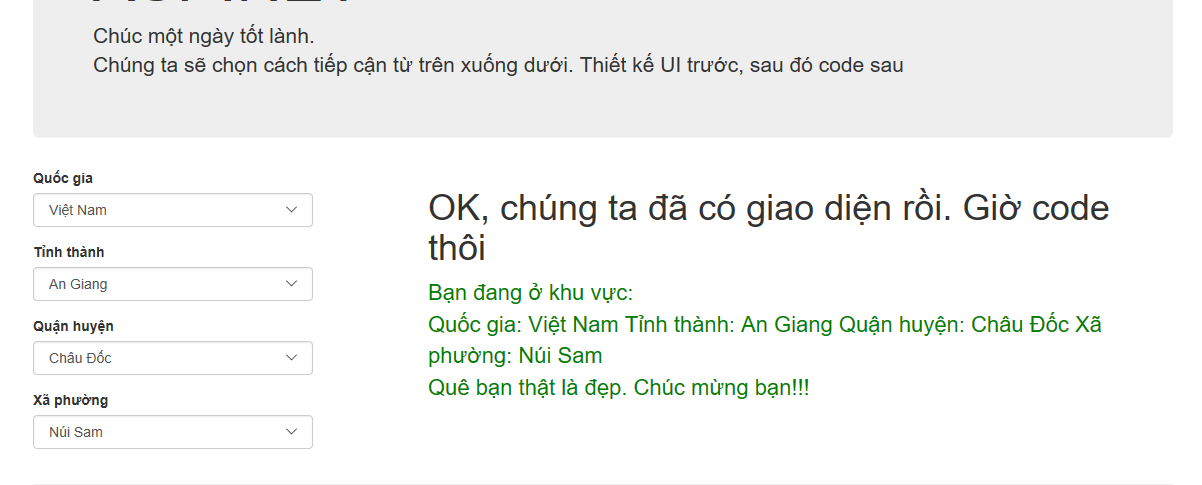
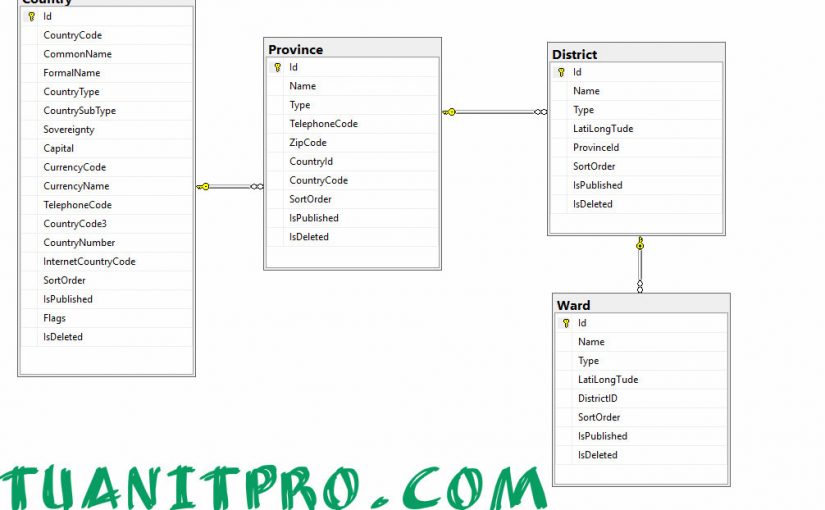
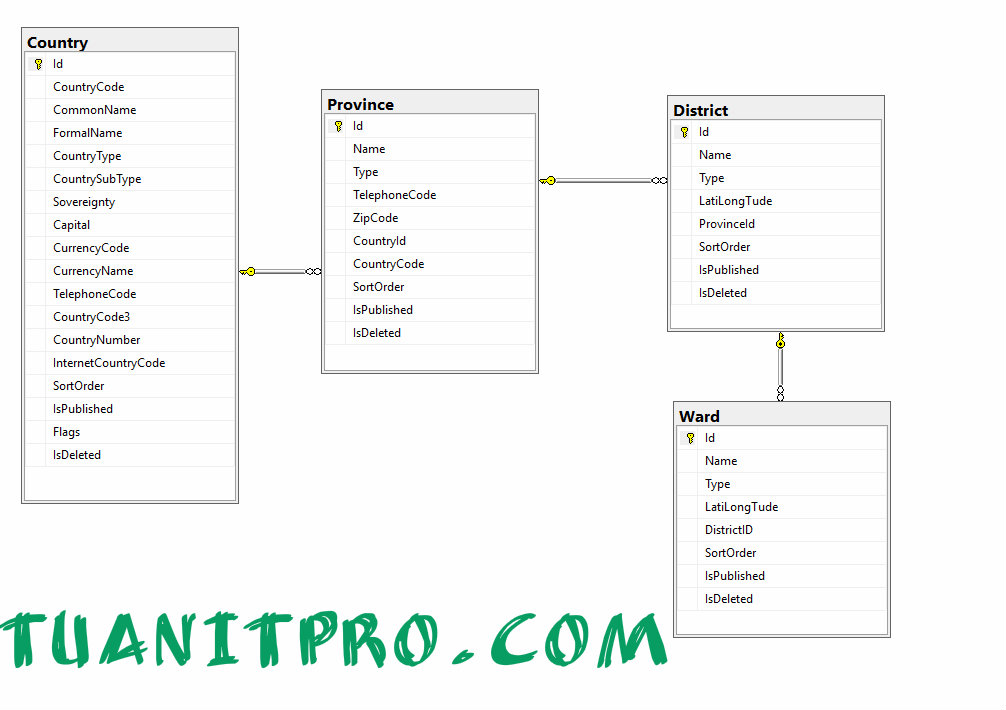
Khi lập trình các bạn hay gặp vấn đề khó khăn khi lấy dữ liệu giữa các Dropdown List khác nhau. Ví dụ: Từ tỉnh thành -> quận huyện -> Xã phường…

Đây là khó khăn của rất nhiều bạn sinh viên khi mới bắt đầu học lập trình. Video dưới đây sẽ hướng dẫn bạn cách giải quyết, khá là đơn giản. Hoàn toàn có thể áp dụng nhiều trường hợp khác nhau.

Video không có tiếng, do mình làm trong lúc ngẫu hứng ngoài quán cafe. Các bạn có thể theo dõi, hoặc tải mã nguồn về phân tích thêm.

Slide giới thiệuhttps://docs.google.com/presentation/d/1soxUWN7Xa6Z89Az-PNCtiyGgMVdVSgmqzp1bf7hdi50/edit?usp=sharing

Tài nguyên

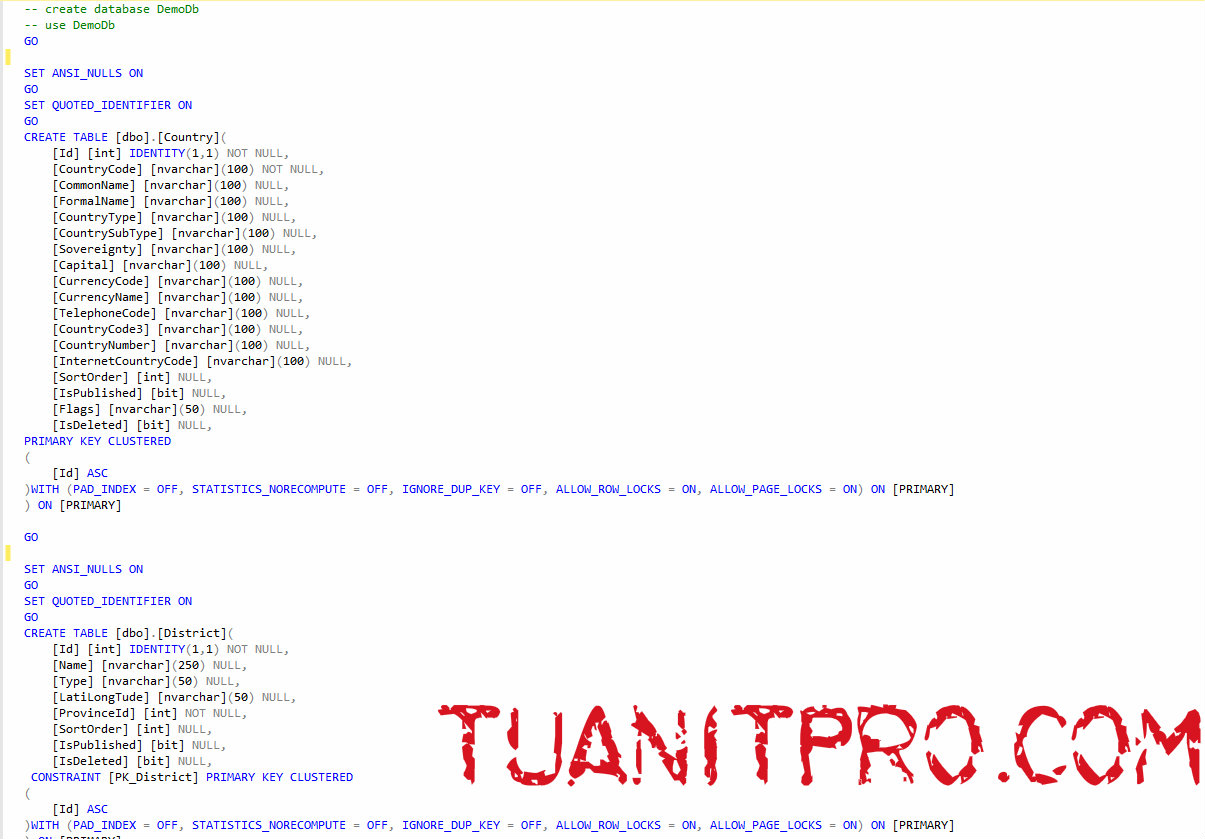
SQL Data:

CSDL tên Quốc gia, tỉnh thành phố thị xã quận huyện, xã phường Việt Nam

Demo

Cascading Dropdown Ajax

Code C#

 public class MyDbContext:DbContext
    {
        // Ở đây các bạn có thể khai báo trong Web.config.
        private const string sqlConnection = @"Data Source=.\SQLExpress; Initial Catalog = CountryDb; User Id=sa; Password = sa";

        public MyDbContext() : base(sqlConnection)
        {

        }
      
        public DbSet<Country> Countries { get; set; }
        public DbSet<Province> Provinces { get; set; }
        public DbSet<District> Districts { get; set; }
        public DbSet<Ward> Wards { get; set; }

    }


  public JsonResult GetAllCountries()
        {
            using(var db = new MyDbContext())
            {
                var data = db.Countries.OrderBy(x=>x.Name).ToList();
                return Json(data, JsonRequestBehavior.AllowGet);
            }
        }
        /// <summary>
        /// Hàm lấy danh sách tỉnh thành theo CountryId. 
        /// Id = 237 là của Việt Nam. Do database mình quy định vậy
        /// Test OK
        /// </summary>
        /// <param name="id">Id của country</param>
        /// <returns></returns>
        public JsonResult GetAllProvinceByCountryId(int? id=237) 
        {
            using (var db = new MyDbContext())
            {               
                var data = db.Provinces.Where(x=>x.CountryId== id).OrderBy(x=>x.Name).ToList();
                return Json(data, JsonRequestBehavior.AllowGet);
            }
        }
        /// <summary>
        /// Hàm lấy tất cả danh sách quận huyện
        /// Id = 1 là Hà Nội, do database mình quy định vậy
        /// Test OK
        /// </summary>
        /// <param name="id">Id = ProvinceId</param>
        /// <returns></returns>
        public JsonResult GetAllDistrictByProvinceId(int? id = 1)
        {
            using (var db = new MyDbContext())
            {
                var data = db.Districts.Where(x => x.ProvinceId == id).OrderBy(x=>x.Name).ToList();
                return Json(data, JsonRequestBehavior.AllowGet);
            }
        }
        /// <summary>
        /// Hàm lấy danh sách xã phường theo quận huyện
        /// Id= 1 là Ba Đình. Do database quy định
        /// Test OK
        /// </summary>
        /// <param name="id"></param>
        /// <returns></returns>
        public JsonResult GetAllWardByDistrictId(int? id = 1)
        {
            using (var db = new MyDbContext())
            {
                var data = db.Wards.Where(x => x.DistrictId == id).OrderBy(x=>x.Name).ToList();
                return Json(data, JsonRequestBehavior.AllowGet);
            }
        }

Code js

// File javascript để lấy dữ liệu

// Khai báo URL service của bạn ở đây
var baseService = "/Service";
var countryUrl = baseService + "/GetAllCountries";
var provinceUrl = baseService + "/GetAllProvinceByCountryId";
var districtUrl = baseService + "/GetAllDistrictByProvinceId";
var wardUrl = baseService + "/GetAllWardByDistrictId";
$(document).ready(function () {
    // load danh sách country
    _getCountries();
    $("#ddlCountry").on('change', function () {
        var id = $(this).val();
        if (id != undefined && id != '') {
            _getProvince(id);
        }
    });

    $("#ddlProvince").on('change', function () {
        var id = $(this).val();
        if (id != undefined && id != '') {
            _getDistrict(id);
        }
    });
    $("#ddlDistrict").on('change', function () {
        var id = $(this).val();
        if (id != undefined && id != '') {
            _getWard(id);
        }
    });
    $("#ddlWard").on('change', function () {
        var countryText = $("#ddlCountry option:selected").text();
        var provinceText = $("#ddlProvince option:selected").text();
        var districtText = $("#ddlDistrict option:selected").text();
        var wardText = $("#ddlWard option:selected").text();
        var html = "Quốc gia: " + countryText + " Tỉnh thành: " + provinceText + " " + "Quận huyện: " + districtText + " " + "Xã phường: " + wardText;
        html += "</br>Quê bạn thật là đẹp. Chúc mừng bạn!!!";
        $("#divResult").html(html);
    });
});
function _getCountries() {
    $.get(countryUrl, function (data) {
        if (data != null && data != undefined && data.length) {
            var html = '';
            html += '<option value="">--Không chọn--</option>';
            $.each(data, function (key, item) {
                html += '<option value=' + item.Id + '>' + item.Name + '</option>';
            });
            $("#ddlCountry").html(html);
        }
    });
}
// truyền id của country vào
function _getProvince(id) {
    $.get(provinceUrl + "/"+id, function (data) {
        if (data != null && data != undefined && data.length) {
            var html = '';
            html += '<option value="">--Không chọn--</option>';
            $.each(data, function (key, item) {
                html += '<option value=' + item.Id + '>' + item.Name + '</option>';
            });
            $("#ddlProvince").html(html);
        }
    });
}
// truyền id của province vào
function _getDistrict(id) {
    $.get(districtUrl + "/" + id, function (data) {
        if (data != null && data != undefined && data.length) {
            var html = '';
            html += '<option value="">--Không chọn--</option>';
            $.each(data, function (key, item) {
                html += '<option value=' + item.Id + '>' + item.Name + '</option>';
            });
            $("#ddlDistrict").html(html);
        }
    });
}
// truyền id của district vào
function _getWard(id) {
    $.get(wardUrl + "/" + id, function (data) {
        if (data != null && data != undefined && data.length) {
            var html = '';
            html += '<option value="">--Không chọn--</option>';
            $.each(data, function (key, item) {
                html += '<option value=' + item.Id + '>' + item.Name + '</option>';
            });
            $("#ddlWard").html(html);
        }
    });
}

Chúc các bạn thành công.

Download  GitHub

How to Upload file in Angular

Backend:

Link demo: http://angular.tuanitpro.com/#/uploader

  • Username: tuanitpro
  • Password: 123456


uploader.component.css

input[type='file']{
    display: none;
}
#uploader{
    width:100%; color:#fff; 
    font-family:Verdana, Geneva, Tahoma, sans-serif; 
     background:#0094ff;
      text-align:center;
       padding:50px;
        cursor:pointer;
}

uploader.component.html

<div class="container body">
  <div class="main_container">

    <div class="right_col" role="main">


      <div class="">
        <div class="clearfix"></div>
        <div class="row">
          <div class="col-md-12">
            <h2>Angular 4 - Upload file</h2>
          </div>

          <div class="col-md-12 col-sm-12 col-xs-12">
            <div class="x_panel" style="height: auto;">

              <div class="x_content">

                <input type="file" id="fileUploadInput" accept="images/*" (change)="fileChange($event)" />
                <div id="uploader"                    (click)="doUploadFile()">
                 <i class="fa fa-picture-o"></i> {{uploadResult.uploadingText}}
                </div>
                <div class="progress progress-striped" *ngIf="uploadResult.progress > 0">
                  <div class="progress-bar progress-bar-success"  [ngStyle]="{'width':  uploadResult.progress+'%'}">{{uploadResult.progress}}%</div>
                </div>
                <img  *ngIf="uploadResult.fileUrl" src="{{uploadResult.fileUrl}}" style="width:100%;" class="img-response">
              </div>
            </div>
          </div>
        </div>
      </div>


    </div>

  </div>
</div>

uploader.component.ts

import { Component, OnInit } from '@angular/core';
import { Title } from '@angular/platform-browser';
import { Http } from '@angular/http';

import $ from 'jquery/dist/jquery.min';

@Component({
  selector: 'app-uploader',
  templateUrl: './uploader.component.html',
  styleUrls: ['./uploader.component.css']
})
export class UploaderComponent implements OnInit {
  uploadingText = 'Chọn file (chỉ chấp nhận file ảnh)';
  uploadResult: any = {
    progress: 0,
    uploadingText: this.uploadingText,
    fileUrl: null
  }
  constructor(private title: Title) { }
  ngOnInit() {
    this.title.setTitle("Angular 4 - Upload file"); 
  }
  doUploadFile() {
    this.uploadResult.progress = 0;
    this.uploadResult.fileUrl = null;
    this.uploadResult.uploadingText = this.uploadingText;
    $("#fileUploadInput").trigger("click");
  }
  fileChange(event) {
    let fileList: FileList = event.target.files;
    if (fileList.length > 0) {
      let file: File = fileList[0];
      let formData: FormData = new FormData();
      formData.append('uploadFile', file);
      let xhr: XMLHttpRequest = new XMLHttpRequest();
      xhr.withCredentials = false;
      xhr.onreadystatechange = () => {
        if (xhr.readyState === 4) {
          if (xhr.status === 200) {
            let json = JSON.parse(xhr.response);
            let fileUrl = 'http://minhquandalat.com/uploads/' + json.Name;
            this.uploadResult.progress = 100;
            this.uploadResult.fileUrl = fileUrl;
            this.uploadResult.uploadingText = "Hoàn thành";

          } else {
            console.log(xhr.response);
          }
        }
      };
      xhr.upload.onprogress = (event) => {
        this.uploadResult.uploadingText = "Đang tải ảnh lên...";
        let percentVal = Math.round(event.loaded / event.total * 100);
        this.uploadResult.progress = percentVal;
      };
      xhr.open('POST', "http://minhquandalat.com/api/FileUpload", true);
      xhr.send(formData);
    }
  }
}

Happy coding

Uploading Multiple Files to Google Drive with Google App Script

Hướng dẫn upload nhiều file trong Google App Script bằng Javascript, kết hợp HTML

Index.html

<!DOCTYPE html>
<html>
  <head>
    <base target="_top">
  </head>
  <body>
    <h1>Uploading Multiple Files to Google Drive with Google App Script</h1>
    
    <div>
        <input type="file" name="filesToUpload" id="filesToUpload" multiple>
        <input type="button" value="Submit" onclick="uploadFiles()">
    
    <br />
    <div id="output"></div>
    </div>
    
    
   <?!= include('Script'); ?>
  </body>
</html>


Code.gs

function doGet() {
   return HtmlService.createTemplateFromFile('Index').evaluate().setTitle("Upload files");
}
function include(filename) {
  return HtmlService.createHtmlOutputFromFile(filename)
      .getContent();
}
function createFolder(parentFolderId, folderName) {
	try {
		var parentFolder = DriveApp.getFolderById(parentFolderId);
		var folders = parentFolder.getFoldersByName(folderName);
		var folder;
		if (folders.hasNext()) {
			folder = folders.next();
		} else {
			folder = parentFolder.createFolder(folderName);
		}
		return {
			'folderId' : folder.getId()
		}
	} catch (e) {
		return {
			'error' : e.toString()
		}
	}
}

function uploadFile(base64Data, fileName, folderId) {
	try {
		var splitBase = base64Data.split(','), type = splitBase[0].split(';')[0]
				.replace('data:', '');
		var byteCharacters = Utilities.base64Decode(splitBase[1]);
		var ss = Utilities.newBlob(byteCharacters, type);
		ss.setName(fileName);

		var folder = DriveApp.getFolderById(folderId);
		var files = folder.getFilesByName(fileName);
		var file;
		while (files.hasNext()) {
			// delete existing files with the same name.
			file = files.next();
			folder.removeFile(file);
		}
		file = folder.createFile(ss);
		return {
			'folderId' : folderId,
			'fileName' : file.getName()
		};
	} catch (e) {
		return {
			'error' : e.toString()
		};
	}
}

Script.html

<script>
		var rootFolderId = '0BzFoC9aU9gwFYXZkbUZiTHg2LVE';
		var numUploads = {};
		numUploads.done = 0;
		numUploads.total = 0;
		var folderName = 'Demo';
		function uploadFiles() {
			var allFiles = document.getElementById('filesToUpload').files;
			  
			
			if (allFiles.length == 0) {
				window.alert('No file selected!');
			} else {
				numUploads.total = allFiles.length;
				google.script.run.withSuccessHandler(createFolder_withSuccessHandler).createFolder(rootFolderId, folderName);
			}
		}
        function createFolder_withSuccessHandler(data){
            var allFiles = document.getElementById('filesToUpload').files;
            for (var i = 0; i < allFiles.length; i++) {						
						uploadFile(allFiles[i], data.folderId);
					}
        }
		function uploadFile(file, folderId) {
			var reader = new FileReader();
			reader.onload = function(e) {
				var content = reader.result;
				document.getElementById('output').innerHTML = 'uploading '
						+ file.name + '...';					
				google.script.run.withSuccessHandler(onFileUploaded)
						.uploadFile(content, file.name, folderId);
			}
			reader.readAsDataURL(file);
		}
		function onFileUploaded(r) {
			numUploads.done++;
			document.getElementById('output').innerHTML = 'uploaded '
					+ r.fileName + ' (' + numUploads.done + '/'
					+ numUploads.total + ' files).';
			if (numUploads.done == numUploads.total) {
				document.getElementById('output').innerHTML = 'All of the '
						+ numUploads.total + ' files are uploaded';
				numUploads.done = 0;
			}
		}	
</script>

Source code

Resize ảnh với HTML5 FileReader

Khi lập trình web, các vấn đề liên quan đến hình ảnh được sử dụng thường xuyên, ví dụ upload hình ảnh sản phẩm, banner, logo….

Từ đây nảy sinh vài vấn đề như: muốn thấy hình ảnh đại diện ngay khi chọn file. Resize hình ảnh để tiết kiệm dung lượng…. Trước khi HTML5 ra đời, chúng ta thường hay giải quyết mọi thứ trên server, tức là upload ảnh lên server, sau đó xử lý. VD: dùng ajax để upload ảnh lên server, sau đó trả về ảnh đại diện…. Điều này dẫn đến tốn thời gian xử lý cho máy chủ, hoặc file lớn, mạng chậm thì user phải chờ đợi rất lâu.

Thật may mắn khi HTML5 ra đời, nó giúp chúng ta cả 2 việc trên luôn. Đó là preview (xem trước) hình ảnh ngay khi vừa chọn xong, đồng thời resize ảnh luôn ngay trên trình duyệt. Sau đó chúng ta chỉ việc upload mã base64 này lên server, và convert lại thành hình ảnh là xong, hoặc lưu luôn base64 vào database cũng ok.

HTML sử dụng API FileReader, nó có thể đọc file ảnh, file txt, khá là thú vị.

Code chọn ảnh xong hiển thị ảnh đại diện

Code javascript

Các bạn chú ý, có sử dụng jQuery

Code resize hình ảnh

Code javascript

See the Pen Resize Image with HTML5 File Reader by tuanitpro (@tuanitpro) on CodePen.

Chúc các bạn thành công.

Convert Image to Base64 String and Base64 String to Image

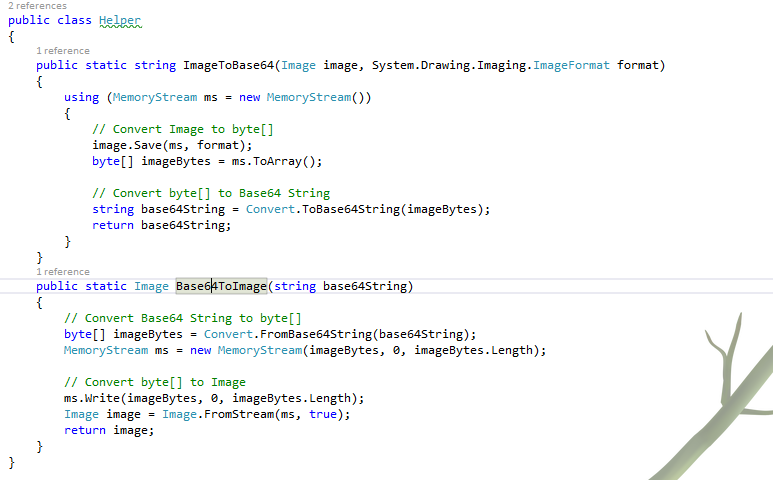
This article will help you to learn how we can convert an image into a base64 string and base64 string back to image.

Image to Base64 String

public string ImageToBase64(Image image, System.Drawing.Imaging.ImageFormat format)
{
  using (MemoryStream ms = new MemoryStream())
  {
    // Convert Image to byte[]
    image.Save(ms, format);
    byte[] imageBytes = ms.ToArray();

    // Convert byte[] to Base64 String
    string base64String = Convert.ToBase64String(imageBytes);
    return base64String;
  }
}

Base64 String to Image

public Image Base64ToImage(string base64String)
{
  // Convert Base64 String to byte[]
  byte[] imageBytes = Convert.FromBase64String(base64String);
  MemoryStream ms = new MemoryStream(imageBytes, 0, imageBytes.Length);

  // Convert byte[] to Image
  ms.Write(imageBytes, 0, imageBytes.Length);
  Image image = Image.FromStream(ms, true);
  return image;
}

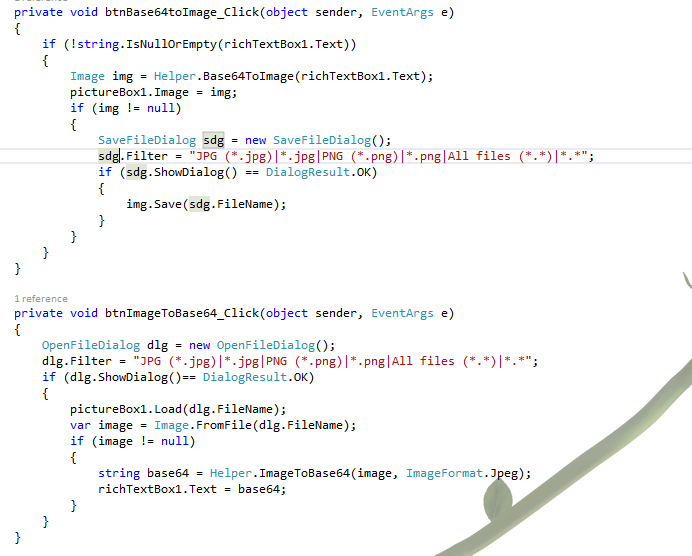
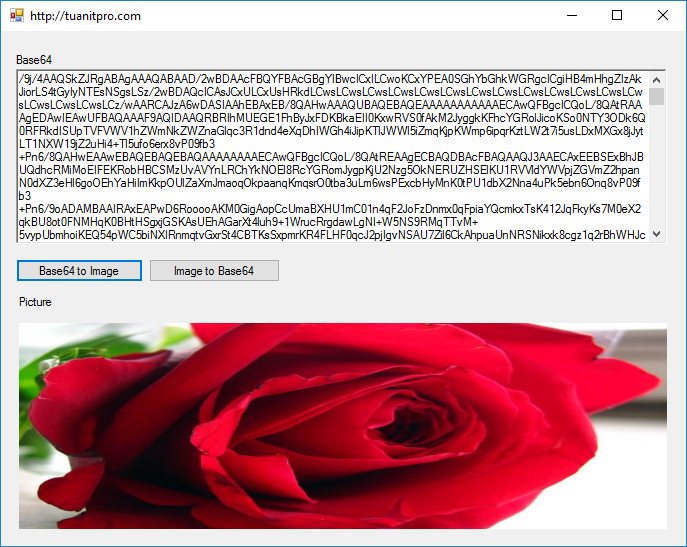
Coding in real world


Result

Download: https://github.com/tuanitpro/base64toimage

Online test: http://codebeautify.org/base64-to-image-converter

Happy coding ?

CSDL tên Quốc gia, tỉnh thành phố thị xã quận huyện, xã phường Việt Nam

  • Thông tin 245quốc gia trên thế giới
  • Thông tin 64 tỉnh thành  phố Việt Nam
  • Thông tin 697 quận huyện / thị xã
  • Thông tin 11110 xã phường

Nguồn tài liệu tham khảo: cổng thông tin điện tử các tỉnh thành, quận huyện, từ điển bách khoa toàn thư điện tử Wikipedia.
Định dạng dữ liệu: bảng cơ sở dữ liệu SQL
Mục đích: chia sẻ giúp các bạn webmaster đang muốn lấy một nguồn thông tin chuẩn mực về tên các đơn vị hành chính cho các dự án website, cổng thông tin điện tử ….

 Download  


Chúc các bạn thành công